
User Guide
Every SlydeForge feature explained in detail, with screenshots — from your first launch to the workflow editor.
SlydeForge is a desktop application for creating and editing presentations, with two complementary ways of working: describe what you want to the AI assistant (prompt-based generation and editing) or edit directly with the mouse (moving, resizing, the properties panel) — both methods apply to the same document, at any time, without ever having to choose one over the other.
1. First launch
On first launch (or as long as no project is open), SlydeForge always asks how you'd like to start — there is never a session that exists "in a vacuum": everything begins from a saved project, which guarantees that the chosen brand kit is properly applied and that the history of exchanges with the AI is preserved.
Four options are offered:
- New project from a brief (AI) — you describe the topic, target audience, and desired number of slides in a few sentences (optionally attaching source files: Excel, Word, PDF, PPTX…); the AI plans and then generates a complete presentation.
- New blank project — starts from a sample presentation ready to be adapted, useful for exploring the application or building on an already polished design.
- New from an existing PowerPoint file — imports an external .pptx file and converts it (a best-effort structural conversion, never blocking: an unsupported element is simply skipped with a warning) into a new, fully editable SlydeForge project; a progress bar shows while the import runs. Handy for picking up an existing presentation and then asking, for example, to update it from an Excel data file — just attach that file to a regular prompt afterward, exactly as with any project.
- Open an existing project — resumes an already saved project, with its full conversation history and versions.
Without an AI backend configured, only manual editing with the mouse works: the setup wizard (see section 15, also reachable later via Help > Initial AI configuration…) reappears at every startup as long as no AI is configured. It presents, as clickable cards, a free trial requiring no credit card (Google Gemini, Groq, or OpenRouter, each with its own icon, to try out SlydeForge's AI features before settling on a lasting configuration), the SlydeForge subscription when it is offered (put forward at the top of the list if already active), and a full connector (OpenAI-compatible API, GitHub Models, or GitHub Copilot Enterprise) for someone who already has their own AI access set up.
2. The main window
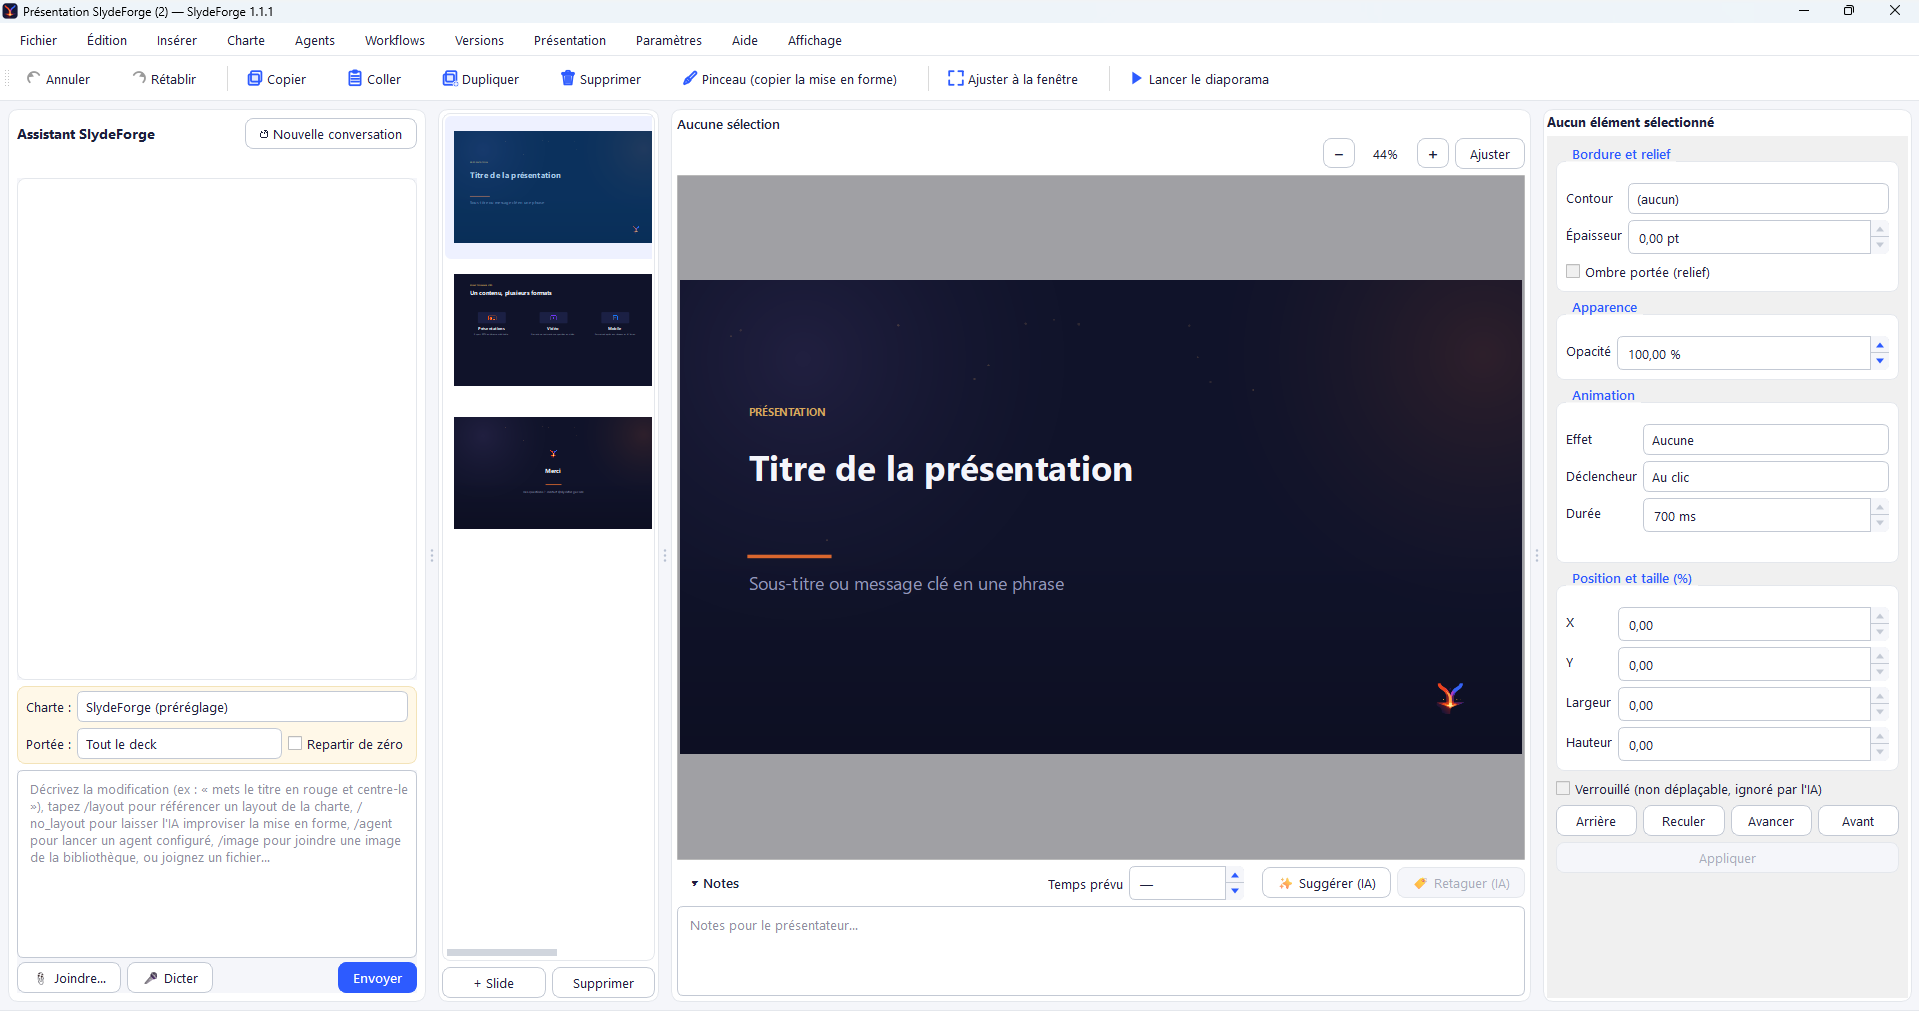
The window is divided into four areas, resizable by dragging the vertical separators:
- SlydeForge Assistant (on the left) — the conversation with the AI: describe a change, attach files, choose the scope ("Whole deck" or "This slide") and the brand kit to use.
- Slide strip — thumbnails of every slide in the deck, reorderable by drag-and-drop; + Slide / Delete buttons at the bottom.
- Canvas (in the center) — the slide currently displayed, editable directly with the mouse (moving, resizing, double-click to edit text).
- Properties panel (on the right) — detailed settings for the selected element (text, shape, image, table, chart), plus position/size and layer management (bring forward/send back).
The menu bar (File, Edit, Insert, Brand kit, Agents, Workflows, Versions, Slideshow, Settings, Subscription, Help, View — Subscription only appears if a SlydeForge subscription is offered) gives access to every function, summarized in the sections below. A toolbar just below it repeats the most common actions (Undo/Redo, Copy/Paste/Duplicate/Delete, Format painter, Fit to window, Start slideshow).
The View menu controls the canvas zoom (Zoom in/Zoom out, Fit to window on Ctrl+0) — a purely visual setting, with no effect on the final render (PPTX export, video, slideshow).
Searching the whole presentation (Ctrl+F)
Edit > Search slides and notes…, the toolbar's Search button or Ctrl+F open a search bar above the canvas. It covers every slide: text boxes and shapes, table cells, chart categories and series, timeline milestones, agenda entries, image alt text and speaker notes.
- A counter ("2 / 7") shows the current match; Enter / Shift+Enter (or F3 / Shift+F3, or the arrow keys) go to the next / previous one, Esc closes the bar. With no match, the field turns red.
- Options: match case, whole word, ignore accents (on by default: "resume" also finds "résumé").
- The matching slide is shown, the word is highlighted (yellow, orange for the current match) and the element is outlined; in the notes, expanded if needed, same highlighting. Matching thumbnails show a magnifier badge with the number of matches.
- List shows every match (slide, location, context): one click takes you there. Results update as you edit the deck.
The File menu
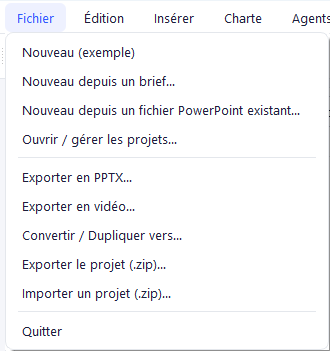
- New (sample) / New from a brief… / New from an existing PowerPoint file… — the same options as at first launch (see section 1), available at any time.
- Open / manage projects… — see the dedicated section.
- Export to PPTX… — see the dedicated section.
- Export to video… — see the dedicated section.
- Convert / Duplicate to… — see the dedicated section.
- Export project (.zip)… / Import project (.zip)… — back up or share ONE complete project (deck, versions, associated brand kit) in a single file, handy for sending it to someone else or moving it to another machine.
- Quit.
The slide strip: right-click
Right-clicking a thumbnail in the strip opens a full menu:
- Insert a slide before / after — to choose exactly where to add it.
- Rename… / Duplicate.
- Hide / Show slide — a hidden slide stays in the project but doesn't appear during the slideshow (just like in PowerPoint).
- Delete — on the slide under the cursor, or on an entire multi-selection at once.
- Several advanced tools (per-slide or multi-slide AI assistance, transitions, animations) — see the dedicated section.
The canvas: right-click
Right-clicking an element on the canvas offers Undo/Redo, Copy/Paste/Duplicate/Delete, the Format painter, Object animation…, and Slide background… — see the dedicated sections.
3. Editing by prompt (the AI assistant)
Type a request in natural language into the input box at the bottom of the assistant panel (e.g. "add a closing slide", "make the title red and center it", "harmonize the colors across all slides") then click Send.
Two settings, just above the input box, apply to every new prompt:
- Brand kit — the brand kit used for this generation/edit (change it here before your first prompt if it's not the right one).
- Scope — "Whole deck" lets the AI modify several slides if the request calls for it (e.g. harmonizing all titles, adding slides); "This slide" targets only the slide displayed on the canvas at the moment you click Send. The conversation thread now explicitly shows which slide was targeted for each prompt sent with "This slide" scope (number + title), so you never lose track when chaining several requests.
- Royalty-free images (checkbox) — lets the AI search for royalty-free photos (Unsplash/Pexels, keys in Settings > Images) related to the current topic and insert one only if it judges it truly adds value to the slide, never automatically; the photographer credit is added as a caption on the slide. Same checkbox in the "New from a brief" dialog, which also offers two finishing touches for a complete result from the very first generation (remembered checkboxes): Add transitions and animations (computed by SlydeForge from the layout — one reveal per card, key figure, step, or milestone — no AI call, no cost) and Write speaker notes (what to say for each slide, synced with the animations; one extra AI call per batch of 5 slides, about +50% tokens on an 8-slide deck, without noticeably lengthening the generation). If an image generation service is configured (Settings > AI), the Generate AI images, at most N checkbox (never ticked by default) lets the plan pick the slides that benefit most from an illustration — the cover first — with a shared visual style; images are created while the slides are being written. Expect an extra 20 to 60 seconds, and each image is billed by your image service.
In the brief, attached images are built in: each one is placed on a slide (portraits on a "team" slide, as round photos), and the final report flags any image that found no place. Web links cited in the brief (up to 5) are actually opened and read as sources; the report lists the pages read and those that could not be (dynamic or protected pages).
While processing, a progress bar shows the current step (preparing context, generating, validating, self-checking…), the elapsed time, and a ⏹ Stop button to interrupt at any time if you started a request by mistake. Only the Send button is locked while this processing is underway — you can keep typing, attach a file, or dictate your next prompt in the meantime, so nothing is lost while chaining several requests.
Before applying the result, SlydeForge always shows a before/after preview of what's about to change — you accept or reject the change; it is never applied silently. Click an image in the preview to compare in detail: before and after enlarged, synchronized zoom (wheel) and panning, and a single view that switches before ⇄ after with the Space key.
You can attach files (Excel, Word, PDF, PowerPoint, images…) to a prompt: their content is extracted and provided to the AI as a data source for the current request. An attached file shows a preview (a real thumbnail for an image/PDF, otherwise a file-type icon); double-click it to open it, or right-click it to open it, show it in File Explorer, copy its path, or remove it.
Challenging the result
At the end of a generation, SlydeForge offers to challenge the result to identify areas for improvement — a dedicated button appears directly in the chat. If you agree, the AI analyzes the deck and proposes, one slide at a time, a concrete area for improvement (clarity of the message, relevance, structure…) along with one or more solutions to choose from with a single click. You can apply a solution, skip to the next suggestion, or finish the analysis at any time; if further improvements remain possible beyond what has already been suggested, SlydeForge asks whether you'd like to continue.
Rating a response (👍/👎)
On certain assistant messages, a simple 👍/👎 (with an optional comment) lets you rate a response. SlydeForge then asks, every time, for confirmation before sharing it with the author — see section 16 for the full mechanism, shared with the feedback log reachable from the Help menu.
4. Editing manually with the mouse
Click an element on the canvas to select it: it becomes movable and resizable (handles on the corners/edges), with magnetic alignment guides that snap to the edges/centers of other elements and of the slide while you drag — just like PowerPoint or Figma.
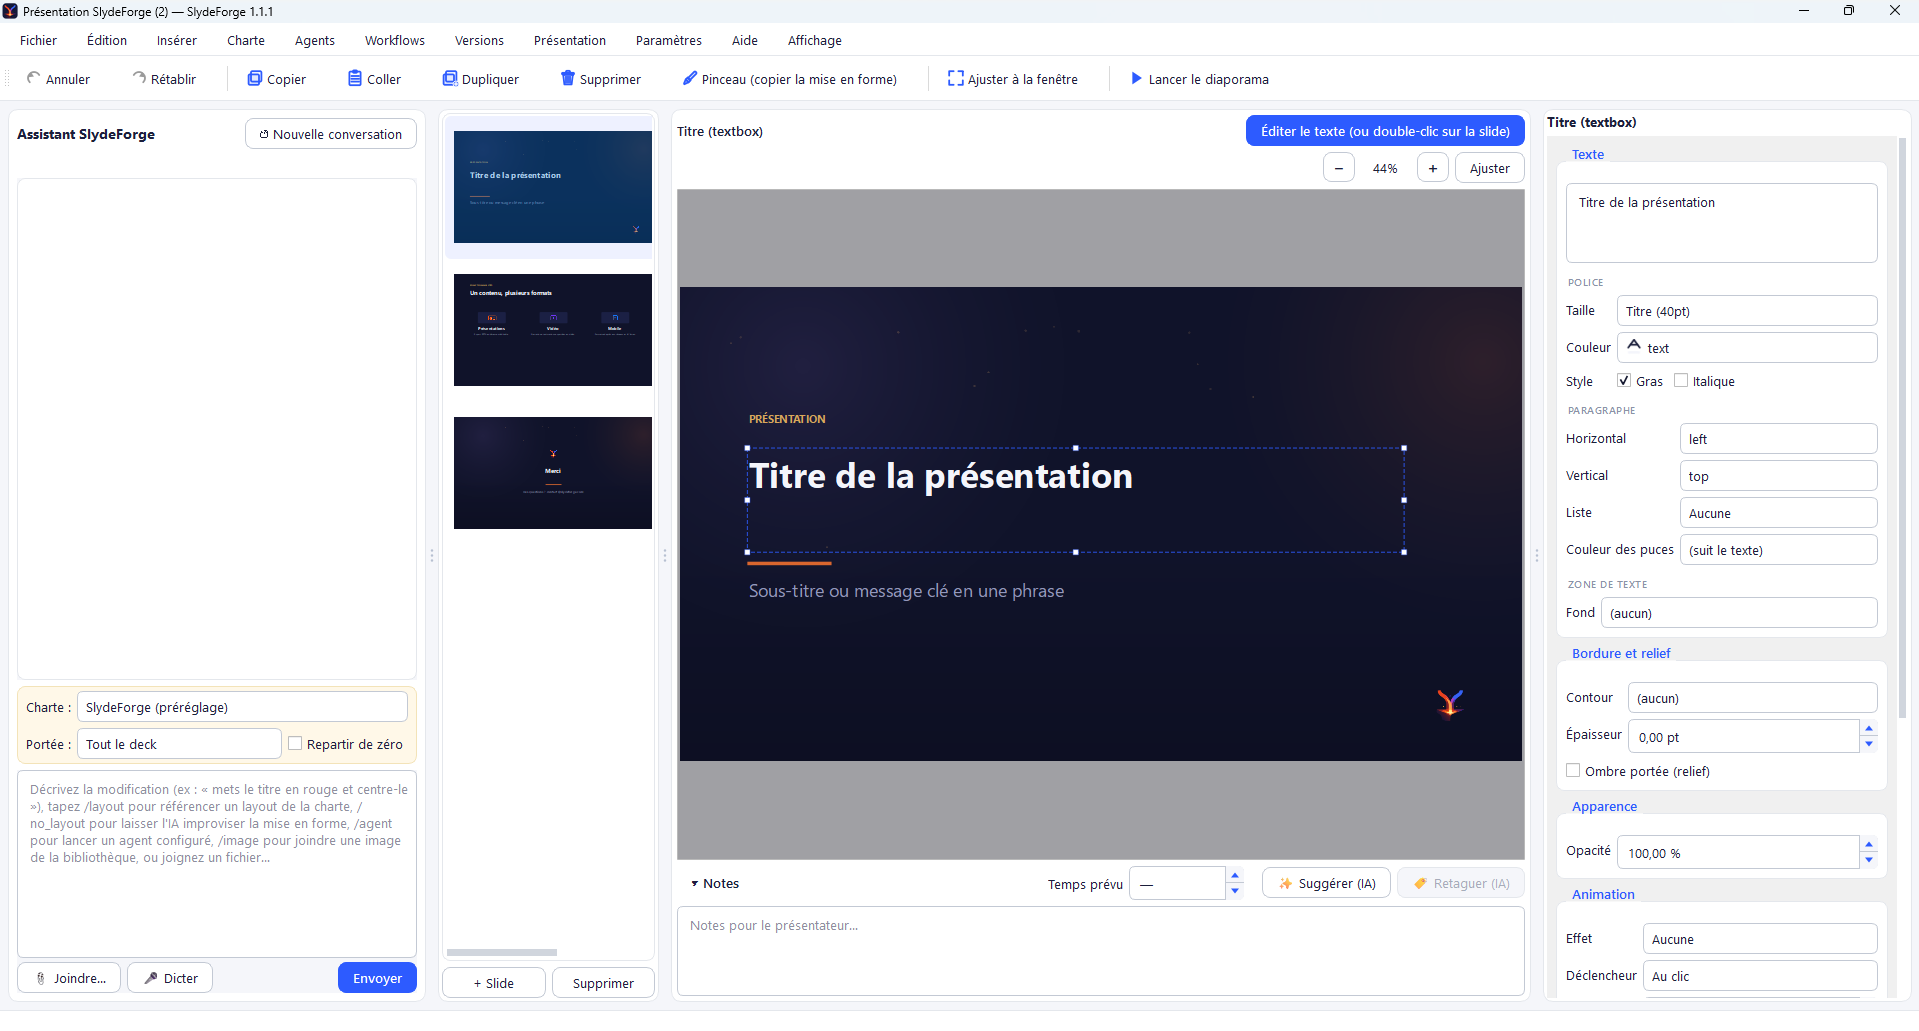
The properties panel on the right adapts to the type of element selected:
- Text — content, size, bold/italic, color, alignment, box background (for a text box).
- Shape — type (rectangle, rounded rectangle, ellipse, hexagon, line, arrow, chevron), fill color.
- Image — fit mode (contain/cover/stretch), image replacement.
- Table / Chart — a dedicated button opens a full editor (rows/columns and styles for a table; type, categories, series, and colors for a chart).
Double-clicking a text element lets you edit it directly in place, without going through the panel.
Every element also has, regardless of its type: its position and size as a percentage of the slide (X, Y, width, height), an optional lock (not movable, ignored by the AI), and layer-management buttons (Send to back/Send backward/Bring forward/Bring to front).
A selected element can also be moved with the keyboard: the arrow keys nudge it by a small step (Shift+arrow for a larger step), including on a multi-selection, and Escape deselects. Ctrl + scroll wheel zooms the canvas, in addition to the View menu's zoom commands (see section 2).
Right-clicking an element also gives access to copy/paste/duplicate/delete, the format painter, and object animation — see section 5 and section 20.
5. Undo, copy-paste and the format painter
The Edit menu groups the basic actions on canvas elements, also available in the toolbar below the menus:
- Undo / Redo (Ctrl+Z / Ctrl+Y) — the undo history covers manual edits as well as AI-made ones.
- Copy / Paste / Duplicate (Ctrl+D) / Delete — on the element currently selected on the canvas.
- Format painter (copy formatting) — select an element, toggle the format painter, then click another element to apply its formatting to it (size, border, fill color, font…), just like PowerPoint's format painter.
The same actions are available by right-clicking an element on the canvas (see section 2).
6. Inserting elements
The Insert menu lets you manually add any type of element to the current slide, grouped by nature:
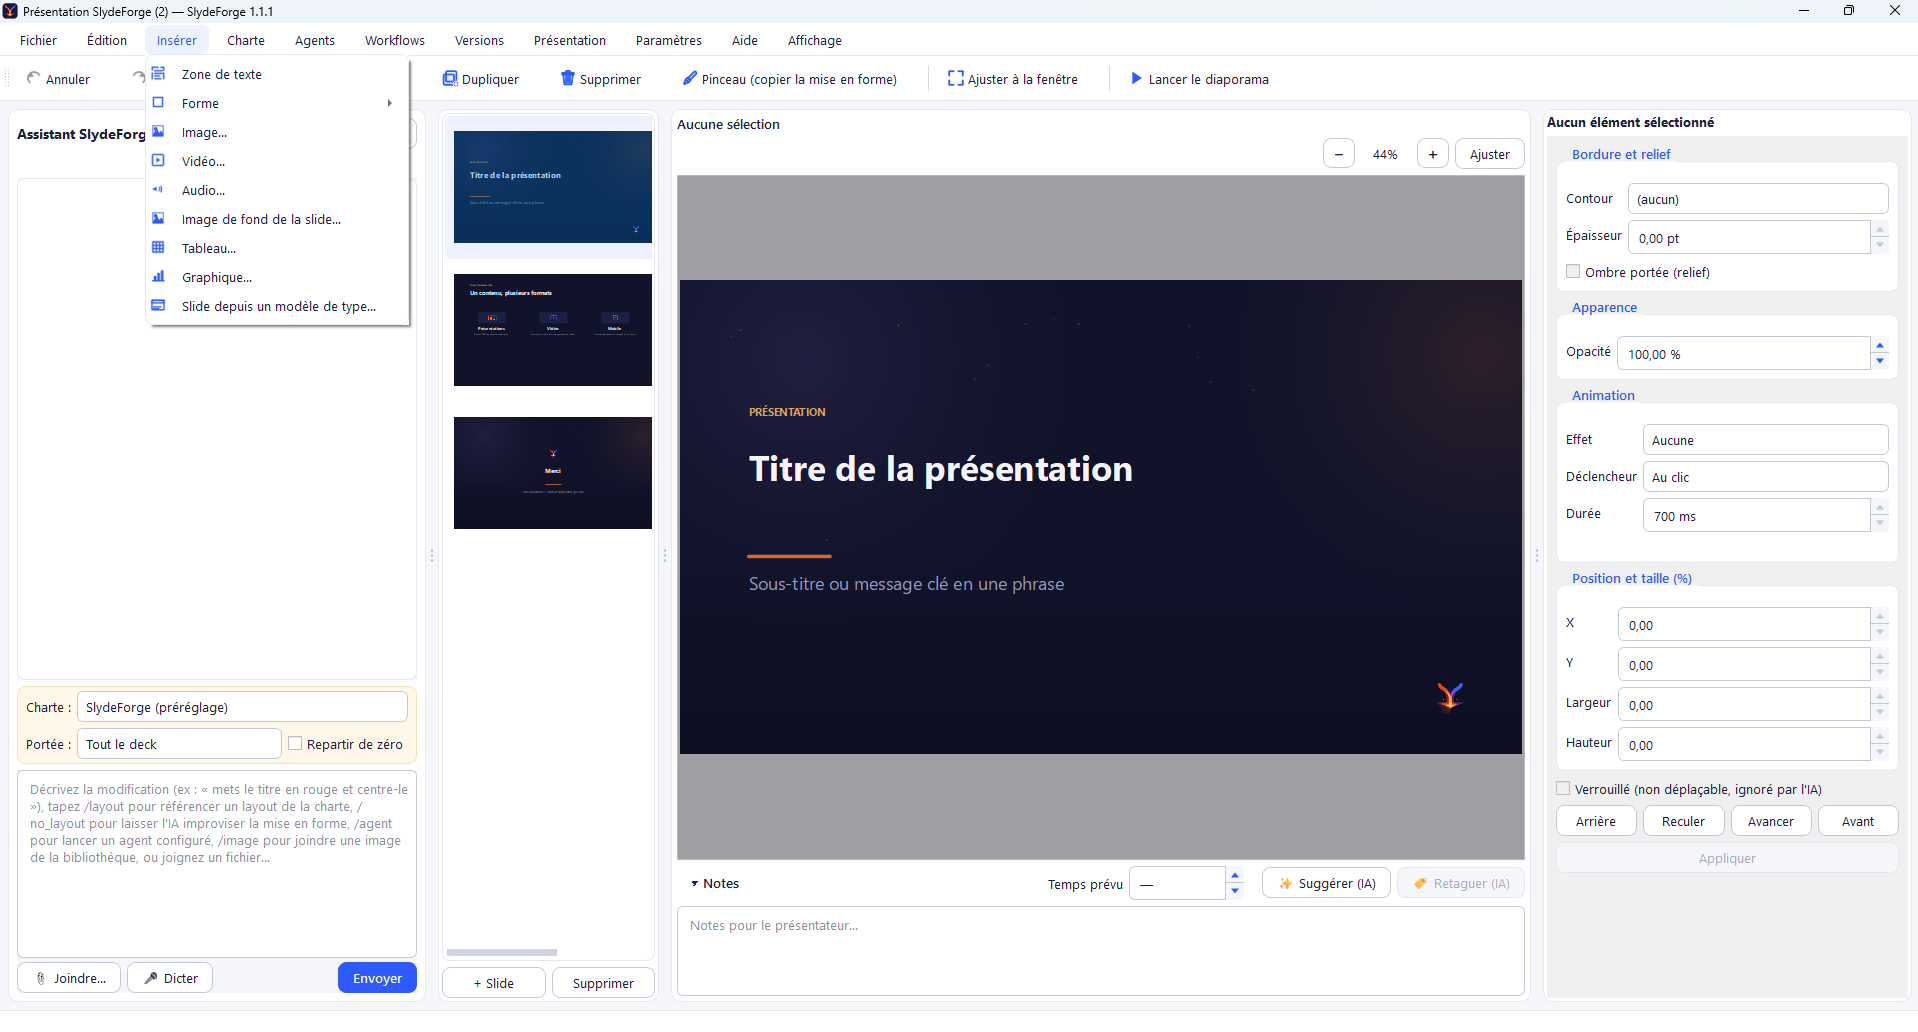
- Text box
- Shape (with a submenu to choose the type — see below)
- Image… (project/brand-kit library, royalty-free search, or AI generation)
- Video… — inserts a video file, played directly on the slide.
- Audio… — inserts an audio file.
- Slide background… — a solid color (brand-kit role or custom color) and/or an image, set in the same dialog.
- Table… / Chart…
- Slide from a type template… — inserts a new slide directly using the layout of a custom type from the brand kit (see section 8)
- Interactive — adds a component that comes to life during the presentation itself (whiteboard, poll...), see section 19
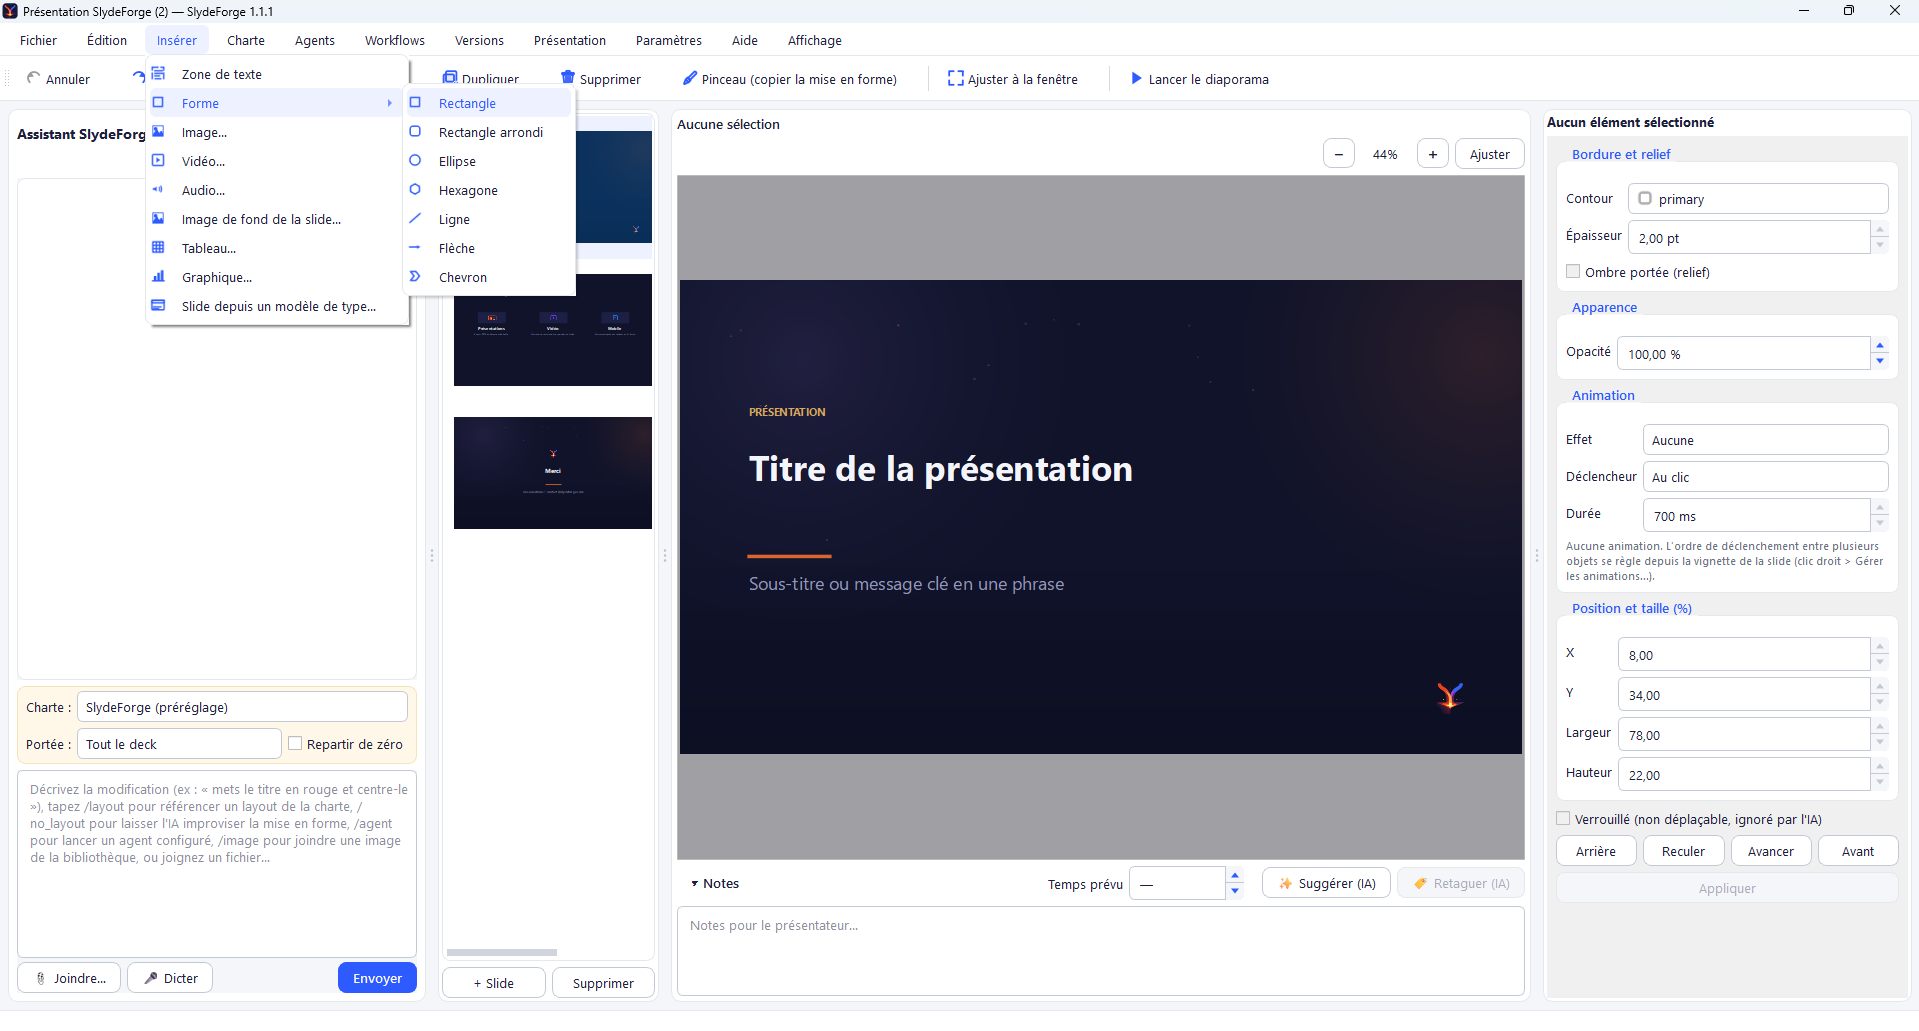
7. Borders and depth (drop shadow)
Any element (text box, shape, image, or table) can be given a border (color + thickness in points) and/or depth (a soft drop shadow), via the "Border and depth" section of the properties panel — use sparingly, to highlight a key element rather than applying it everywhere by default.
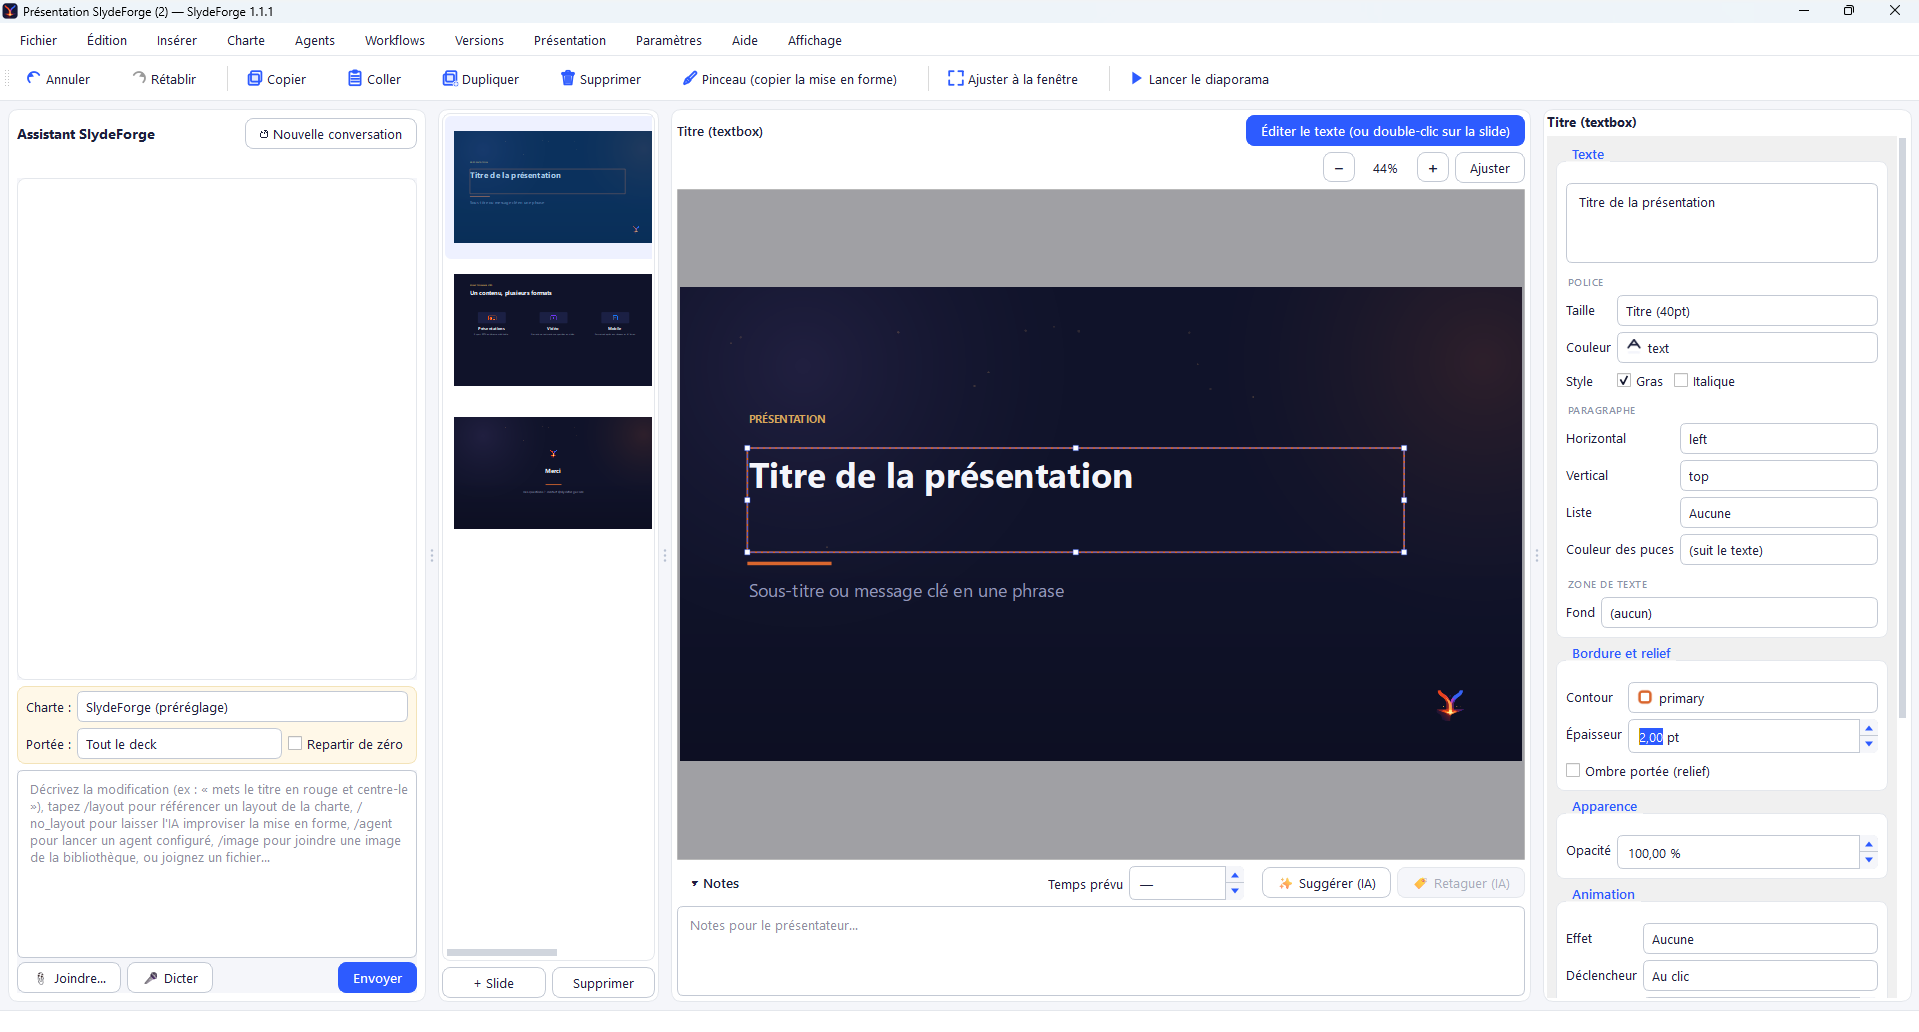
This setting looks identical on screen and in the PowerPoint export: what you see in SlydeForge faithfully matches the generated .pptx file. The AI can also choose to use these properties on its own when the request calls for it (e.g. "highlight this key figure").
8. The brand kit
Brand kit menu:
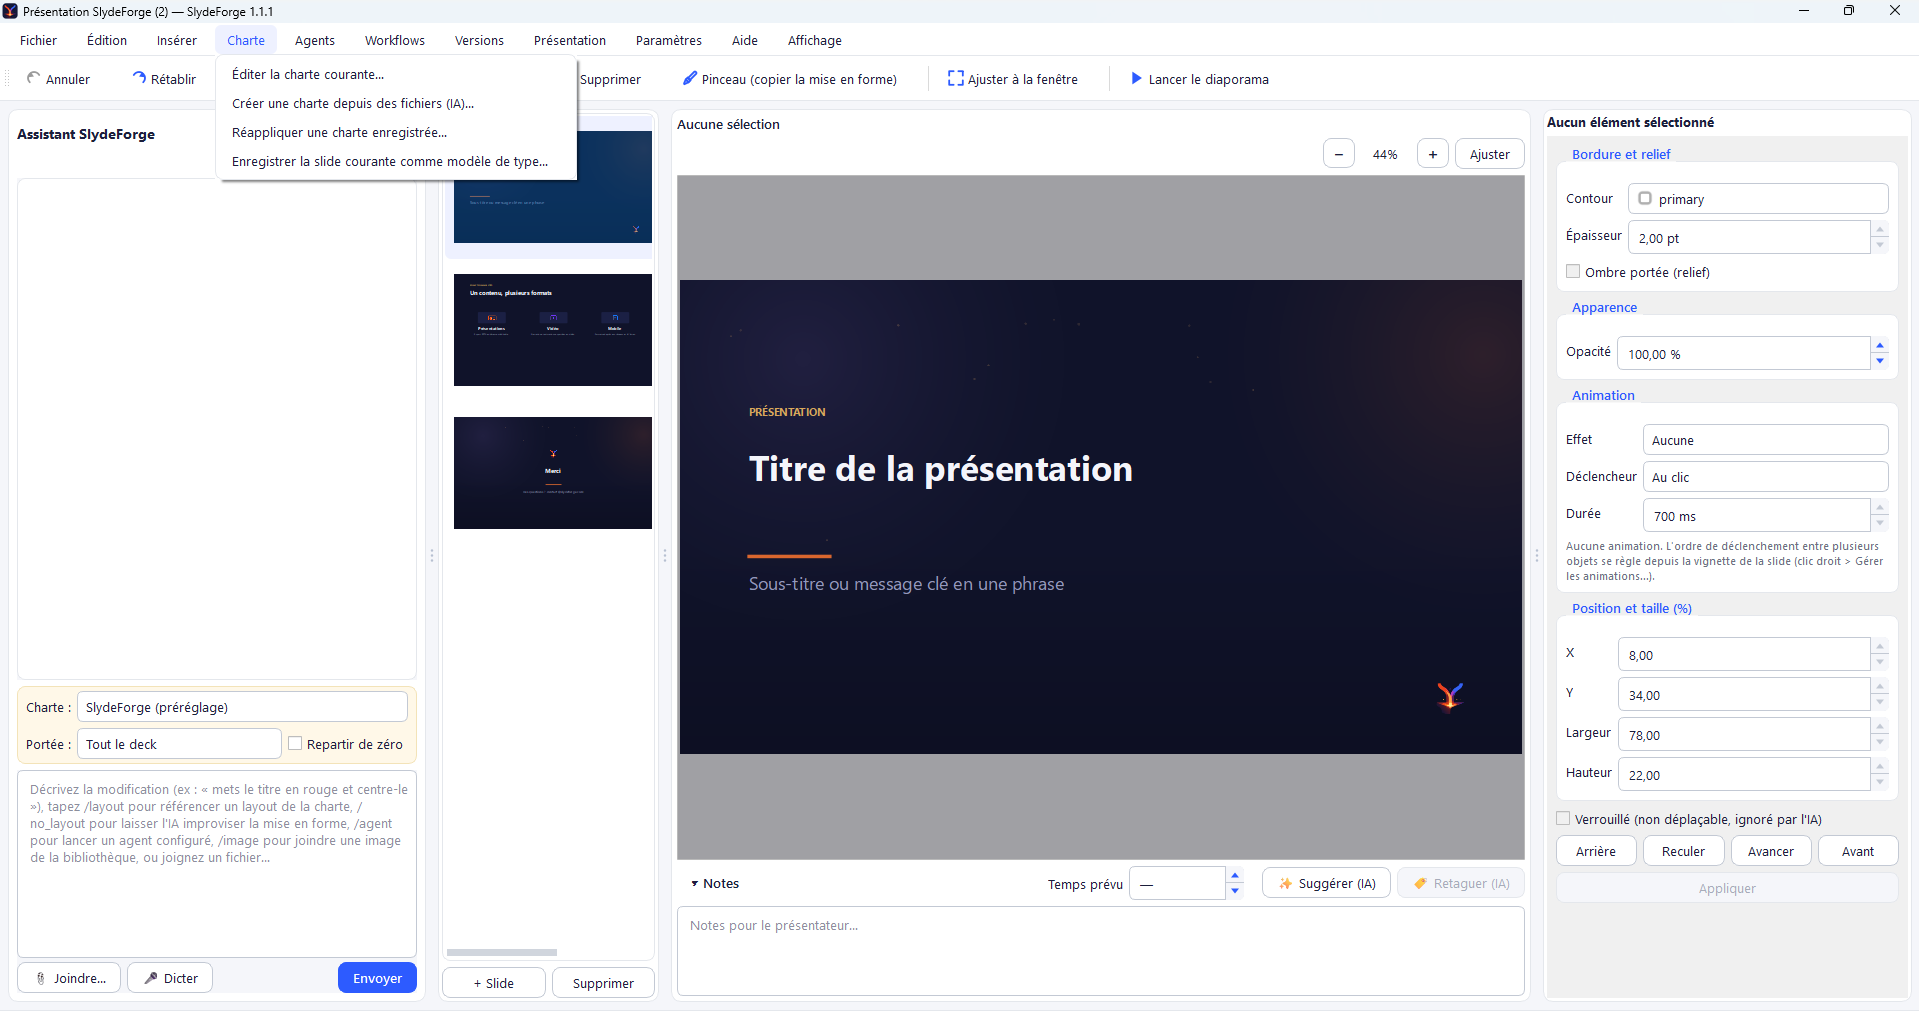
- Edit the current brand kit… — opens the full editor (color palette by role, fonts, text sizes, bullets, images/icons favored by the AI, custom slide types).
- Create a brand kit from files (AI)… — analyzes one or more files (logo, existing PPTX, screenshots…) to automatically infer a complete brand kit (colors, fonts, visuals sorted into images/icons, and suggested slide types).
- Reapply a saved brand kit…
- Save the current slide as a type template… — captures the layout of the displayed slide to turn it into a reusable type.
- Brand kit marketplace… — a catalog of brand kits published online, installable in one click (search, categories, removal). SlydeForge always displays the latest brand kit known locally, but flags when an update is available for a brand kit already installed from the marketplace.
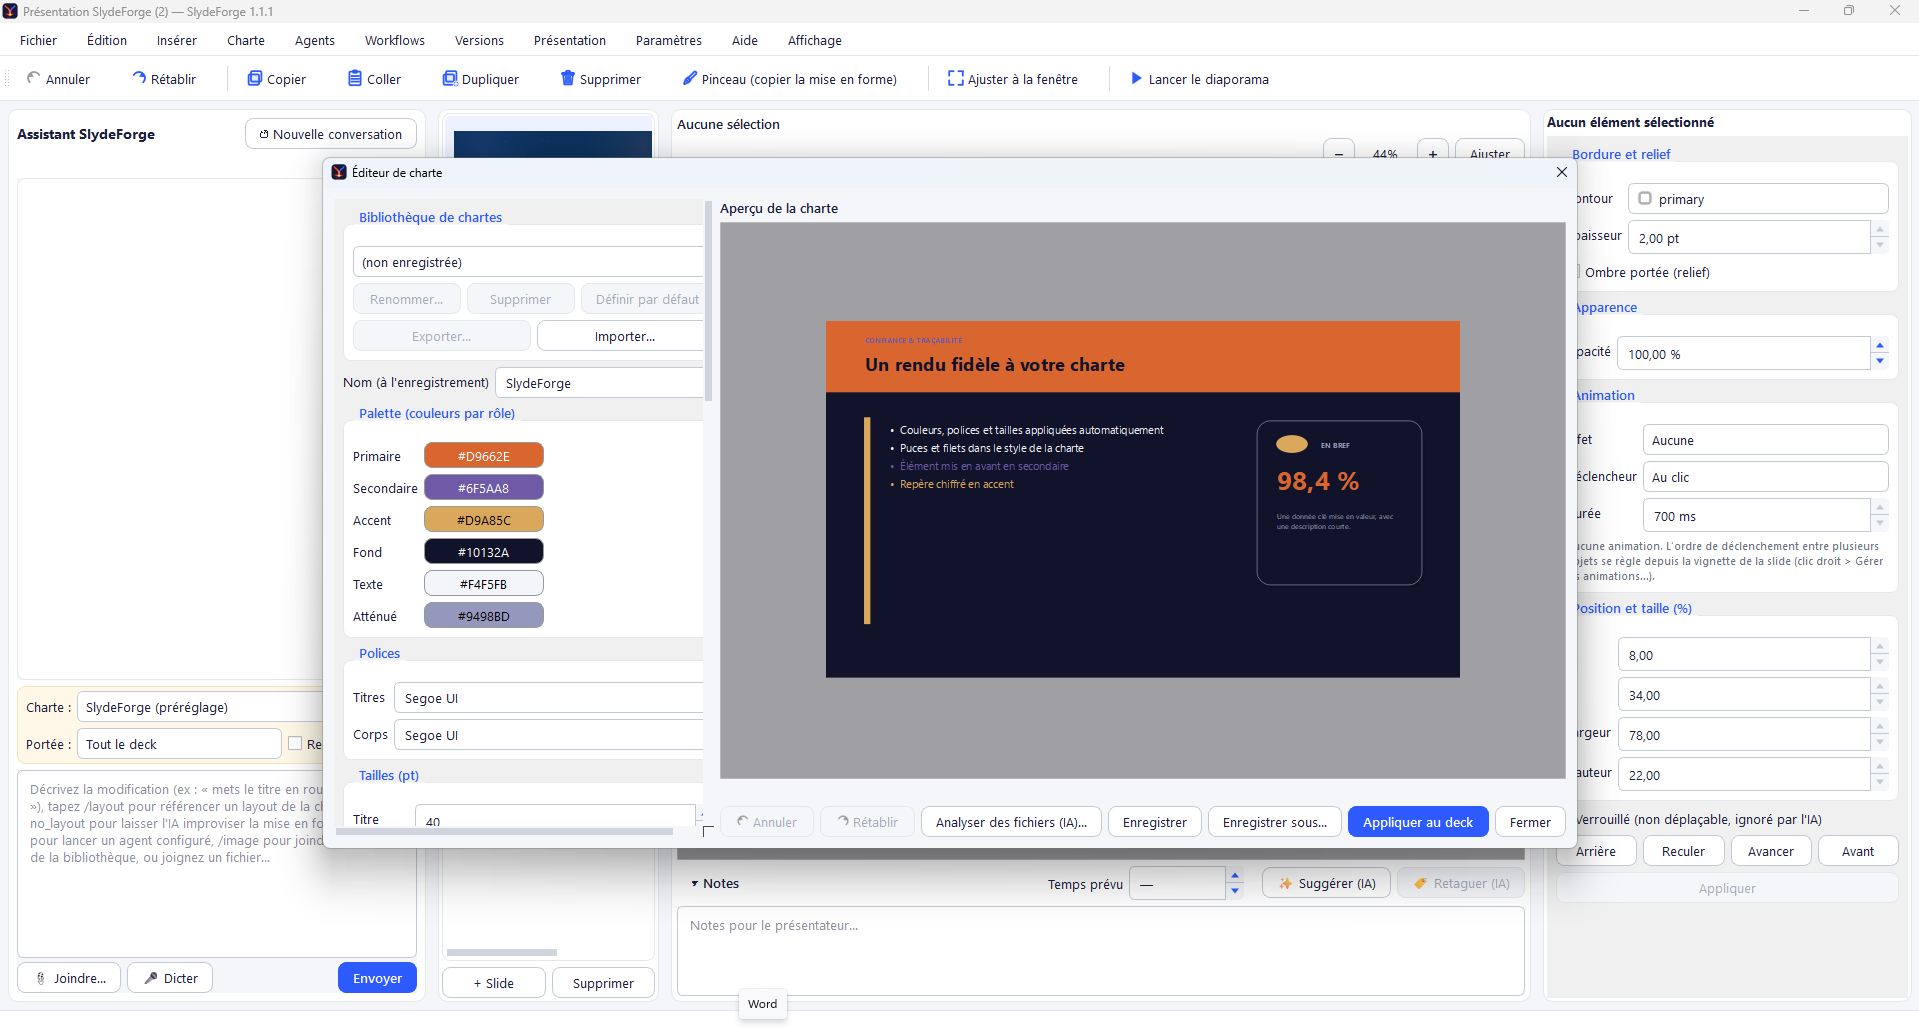
The brand kit editor lets you choose which brand kit to edit (a brand-kit library is shared across projects), adjust the palette (colors named by role: primary, secondary, accent, background, text, muted), fonts and text sizes, bullets, and manage the images/icons the AI should favor during generation.
At the bottom of the editor, the Custom slide types section lets you define editorial types (e.g. "Intro", "Dark section", "Conclusion") with a description of when the AI should use them, and optionally a complete layout attached to it (background, elements, colors):
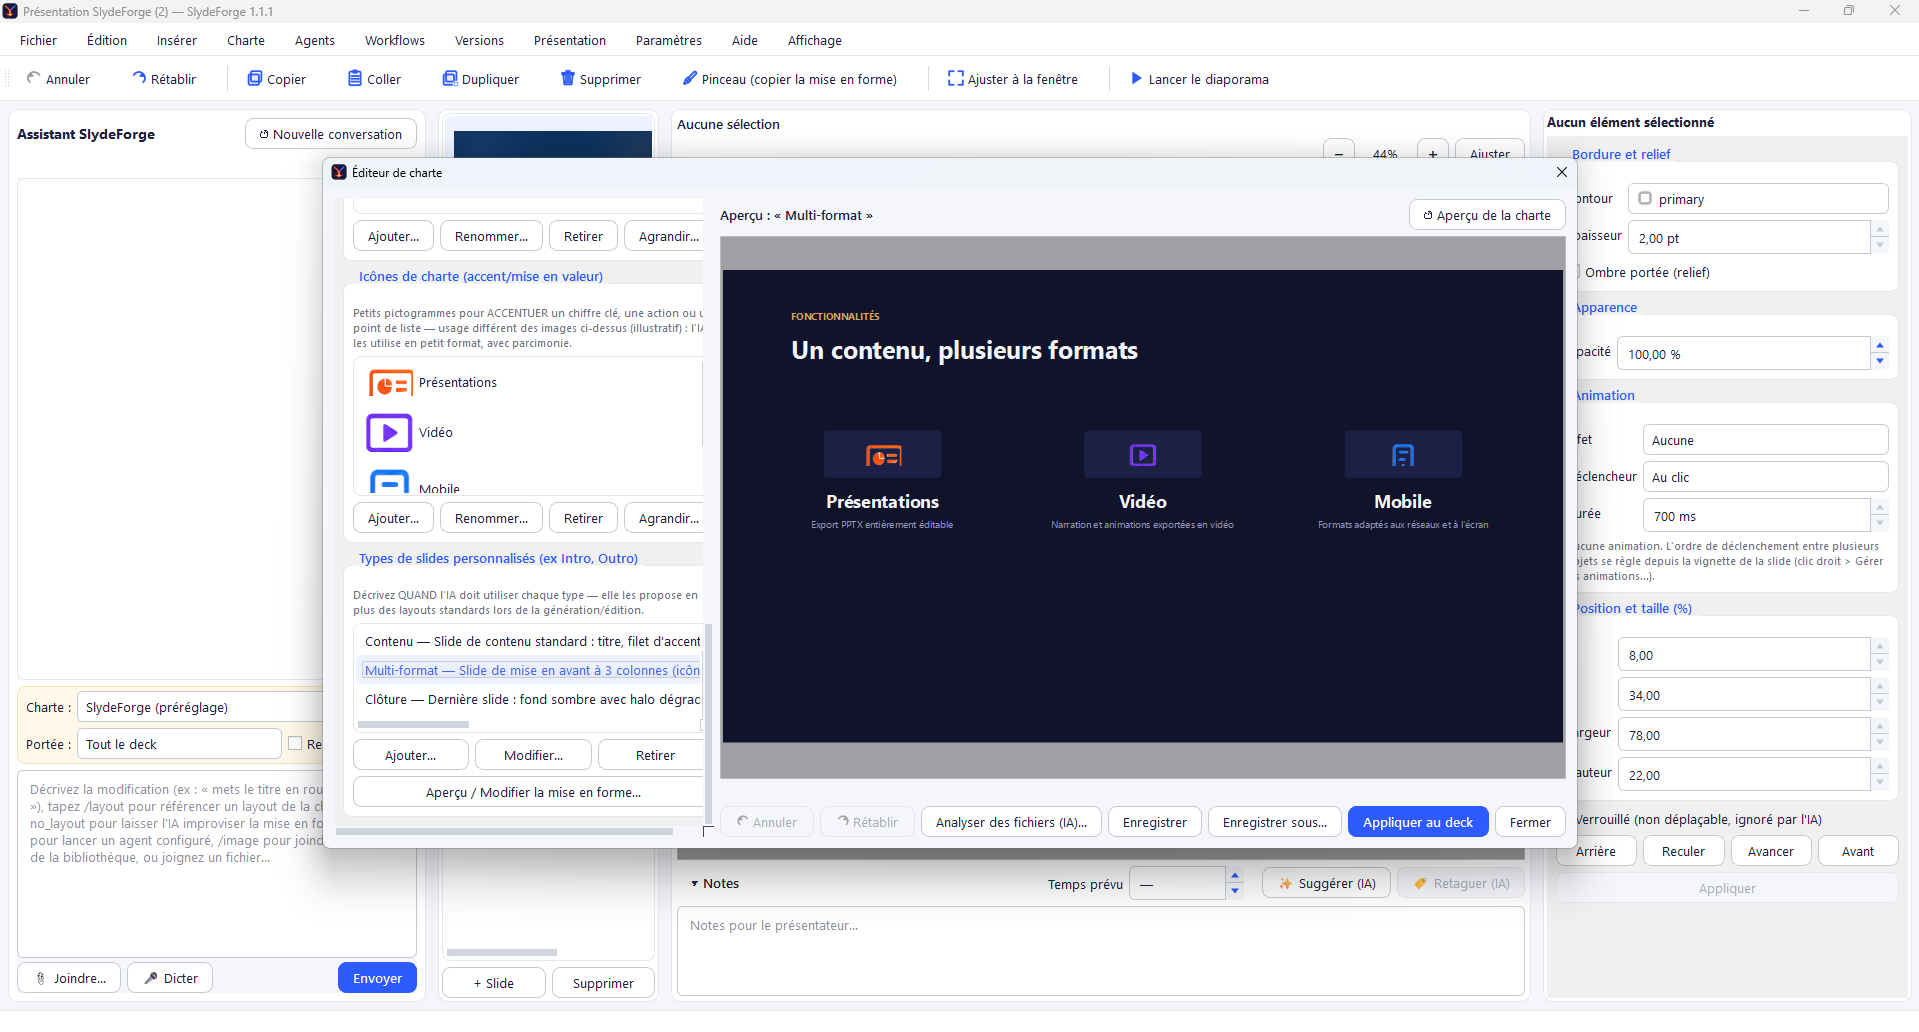
Double-clicking a type in the list (or the "Preview / Edit the layout…" button) opens a dedicated visual editor directly, to draw/adjust that template, with the same tools as the main canvas.
9. Version history
The Versions menu opens a timeline of every change made to the project: each edit (manual or by AI) automatically creates a version, and you can create a named manual checkpoint at any time, then restore any earlier version.
On top of these versions, the project is saved continuously in the background while you work: even without creating a manual checkpoint, a crash or an unexpected shutdown never loses your current work.
10. Presentation mode (slideshow and presenter console)
Slideshow > Start slideshow (shortcut F5, also available via the ▶ toolbar button) starts the full-screen slideshow from the slide currently displayed. Transitions between slides (configured via a right-click on the slide, see section 20) animate both in this slideshow and in the PPTX export — never in the static preview of the editing canvas.
On a machine with two screens (e.g. a connected video projector), SlydeForge asks how you'd like to present:
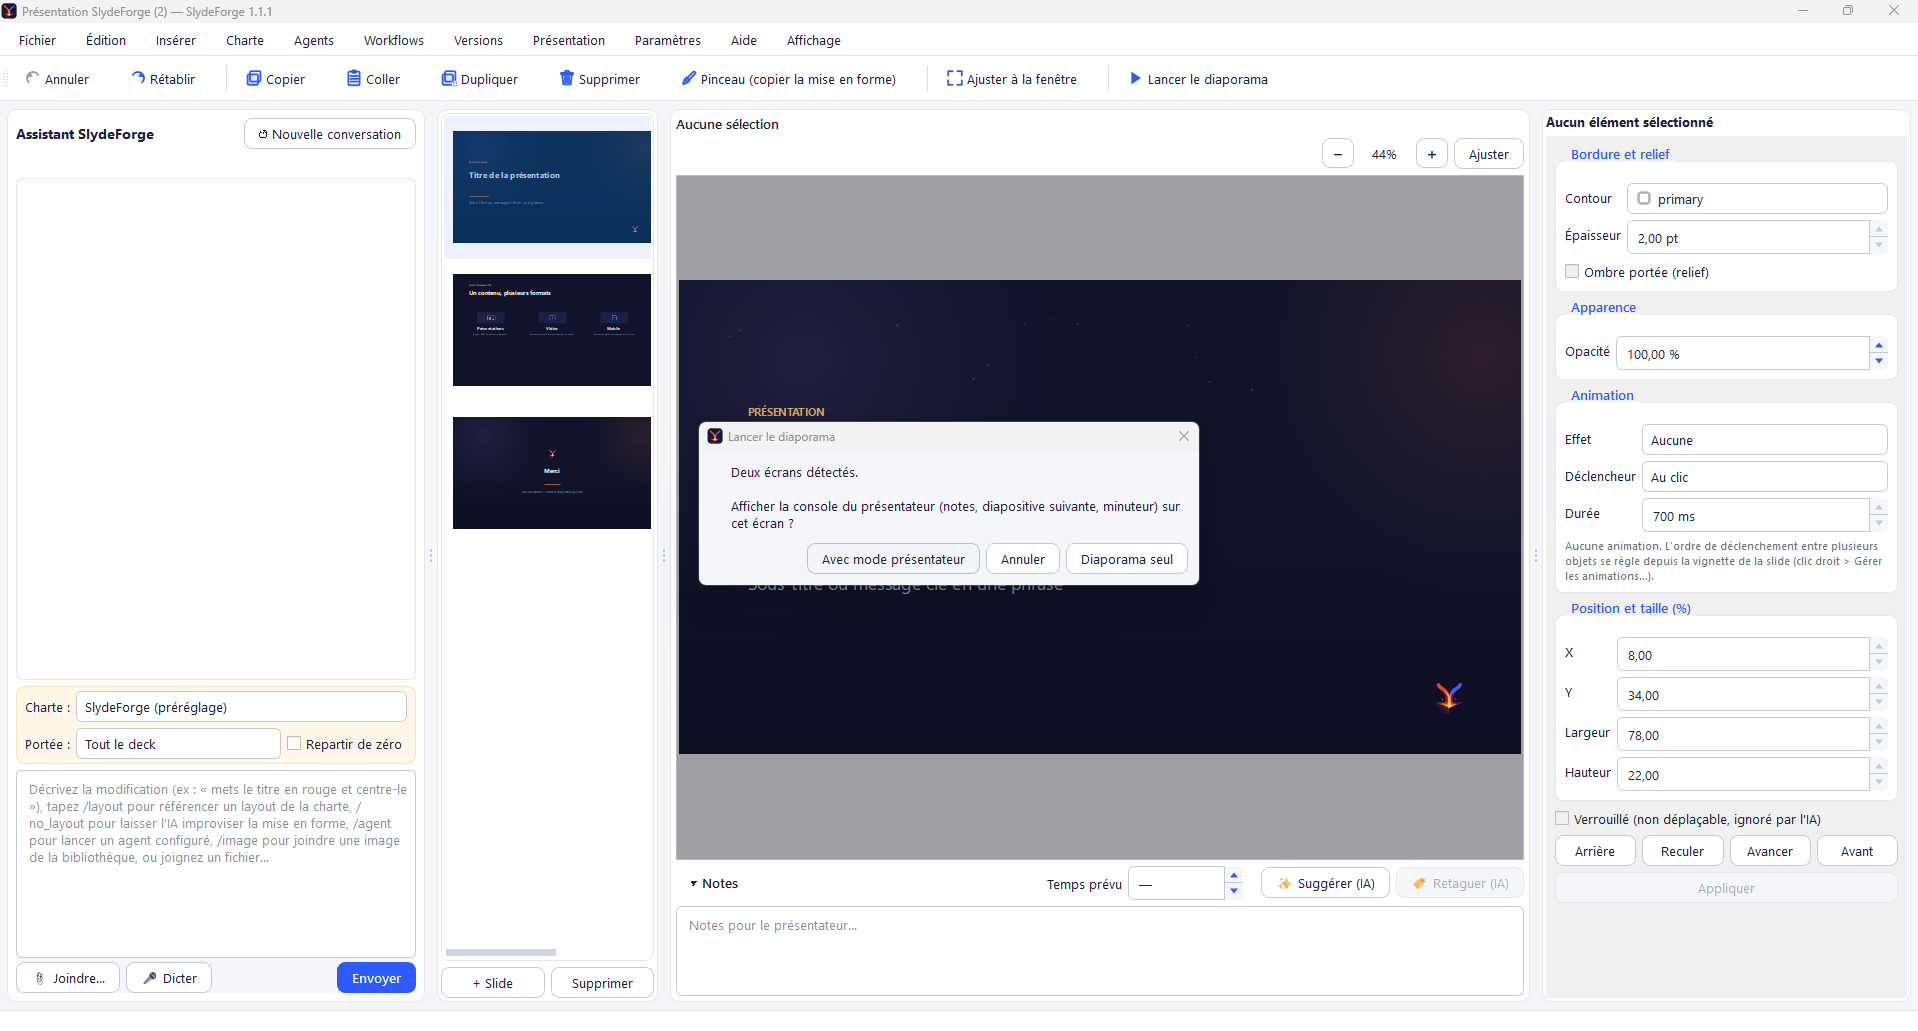
- With presenter mode — the full-screen slideshow goes to the second screen (the video projector, almost always the secondary screen) while the presenter console stays on the first.
- Slideshow only — full screen only, without the console.
- Cancel.
On a machine with a single screen, the slideshow starts directly without this prompt (the console would cover the screen); it remains accessible at any time with the P key, which toggles between slideshow-only and presenter mode even while presenting.
Two small ‹ / › buttons, discreetly placed on the left and right edges of the screen, let you move forward/back with a click during the slideshow — handy when presenting without a dedicated console and the keyboard shortcuts below aren't yet second nature.
The presenter console
Reserved for the presenter (never projected to the audience), it displays the current slide, a preview of the next slide, the notes for the current slide, a timer, your position in the deck, and navigation buttons:
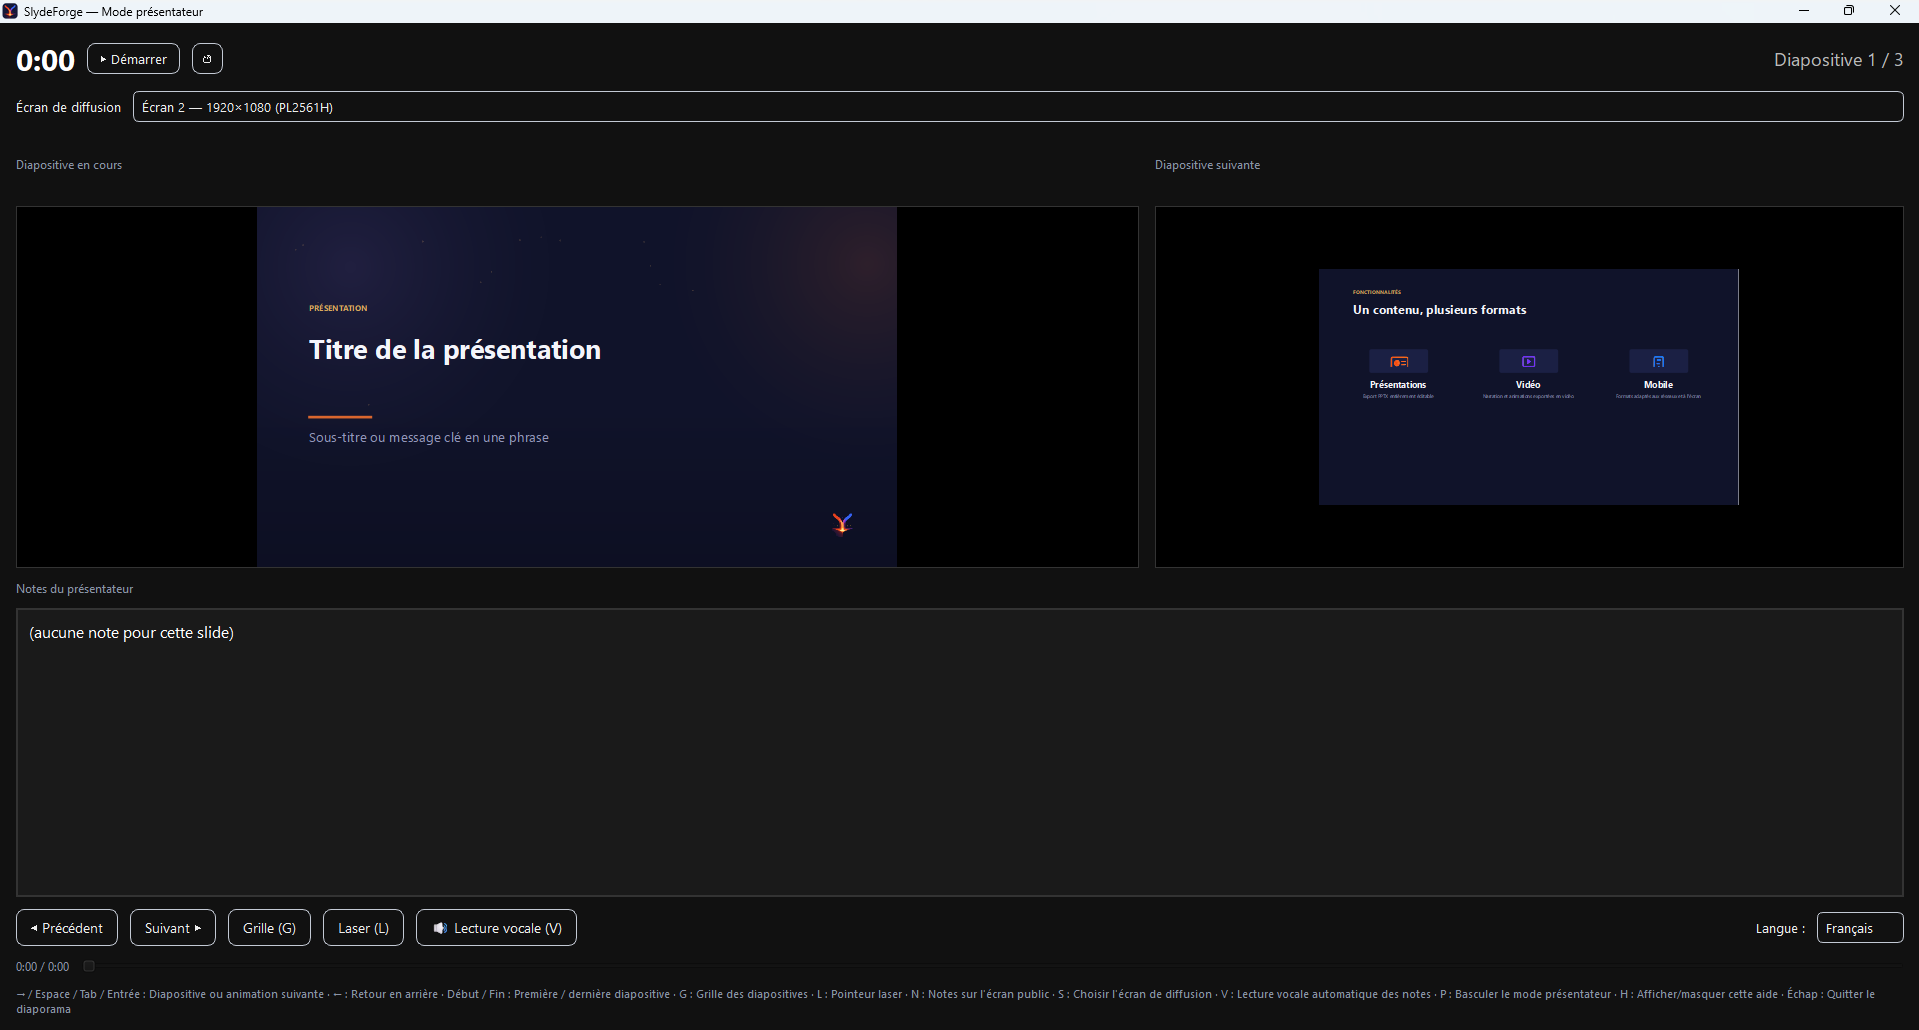
Keyboard shortcuts available both in the slideshow and from the console:
| Key | Action |
|---|---|
| → / Space / Tab / Enter | Next slide or animation step |
| ← | Go back |
| Home / End | First / last slide |
| G | Slide grid |
| L | Laser pointer |
| N | Notes on the public screen |
| S | Choose the display screen |
| V | Automatic voice reading of the notes |
| P | Toggle presenter mode |
| H | Show/hide the shortcuts help |
| Esc | Exit the slideshow |
Automatic voice reading
The 🔊 Voice reading (V) button (or the V key) plays the whole presentation on autopilot: each slide's notes are narrated aloud by the text-to-speech engine configured in Settings > Voice (see section 21), then the slide's animation steps play out on their own at the pace of the narration, before automatically moving on to the next slide — with no need to click to advance. The console shows a progress bar for the current narration (with the ability to skip forward/back within it) and a language selector (French/English, expandable), which can be changed on the fly without interrupting the presentation.
11. Exporting to PowerPoint
File > Export to PPTX… produces a .pptx file that is fully editable in PowerPoint (every JSON element becomes a real PowerPoint object — textbox, shape, image, table, native chart — not a flattened image). The default filename reuses the project name and today's date, saved to a dedicated exports folder (easy to find and clean up). The formatting (colors, borders, depth, images fitted according to their contain/cover/stretch mode…) faithfully matches what is displayed in SlydeForge.
12. Video generation
File > Export to video… generates an MP4 video of the presentation: each animation step becomes a frame, each slide's notes are narrated aloud if a voice engine is configured (Settings > Voice, see section 21), and the pace of the video follows the actual duration of that narration (a slide with no notes or narration stays on screen for a default amount of time).
A configuration popup precedes the export:
- Destination — path of the .mp4 file (defaults to the application's exports folder; changeable via Browse…).
- Resolution — 1920×1080 (quality) or 1280×720 (faster, lighter).
- ffmpeg status — assembling the video requires ffmpeg; if it isn't installed, a message says so along with an Install ffmpeg… button that walks through the installation automatically (you never need to go find it yourself online).
Clicking Export shows live progress in the same window (current slide out of the total), with no separate window.
13. Changing format or duplicating for another use
File > Convert / Duplicate to… adapts a presentation to a different format from the original one — useful, for example, for turning a 16:9 meeting presentation into a vertical story for social media, without starting over.
Available formats:
- Screen formats — 16:9, 4:3, 16:10.
- Social media formats (portrait or square, with safe zones adapted to app interfaces and a raised minimum text size to stay readable) — 9:16 (story/reel), 1:1 (square post), 4:5 (portrait post).
Two ways to apply the change:
- Duplicate to a new project (recommended, checked by default) — the original project stays intact.
- Convert this project in-place — modifies the current project (still undoable, like any other edit).
By default, a deterministic engine recomputes the position and size of every element for the new format, instantly and with no network call. An AI adaptation (optional) checkbox, unchecked by default, can be checked to let the AI recompose each slide one at a time (with a before/after preview) if the deterministic engine's result doesn't work as-is.
14. Project management
File > Open / manage projects… lists all your projects, with a thumbnail of the 1st slide, the number of slides and versions, and the creation/modification dates:
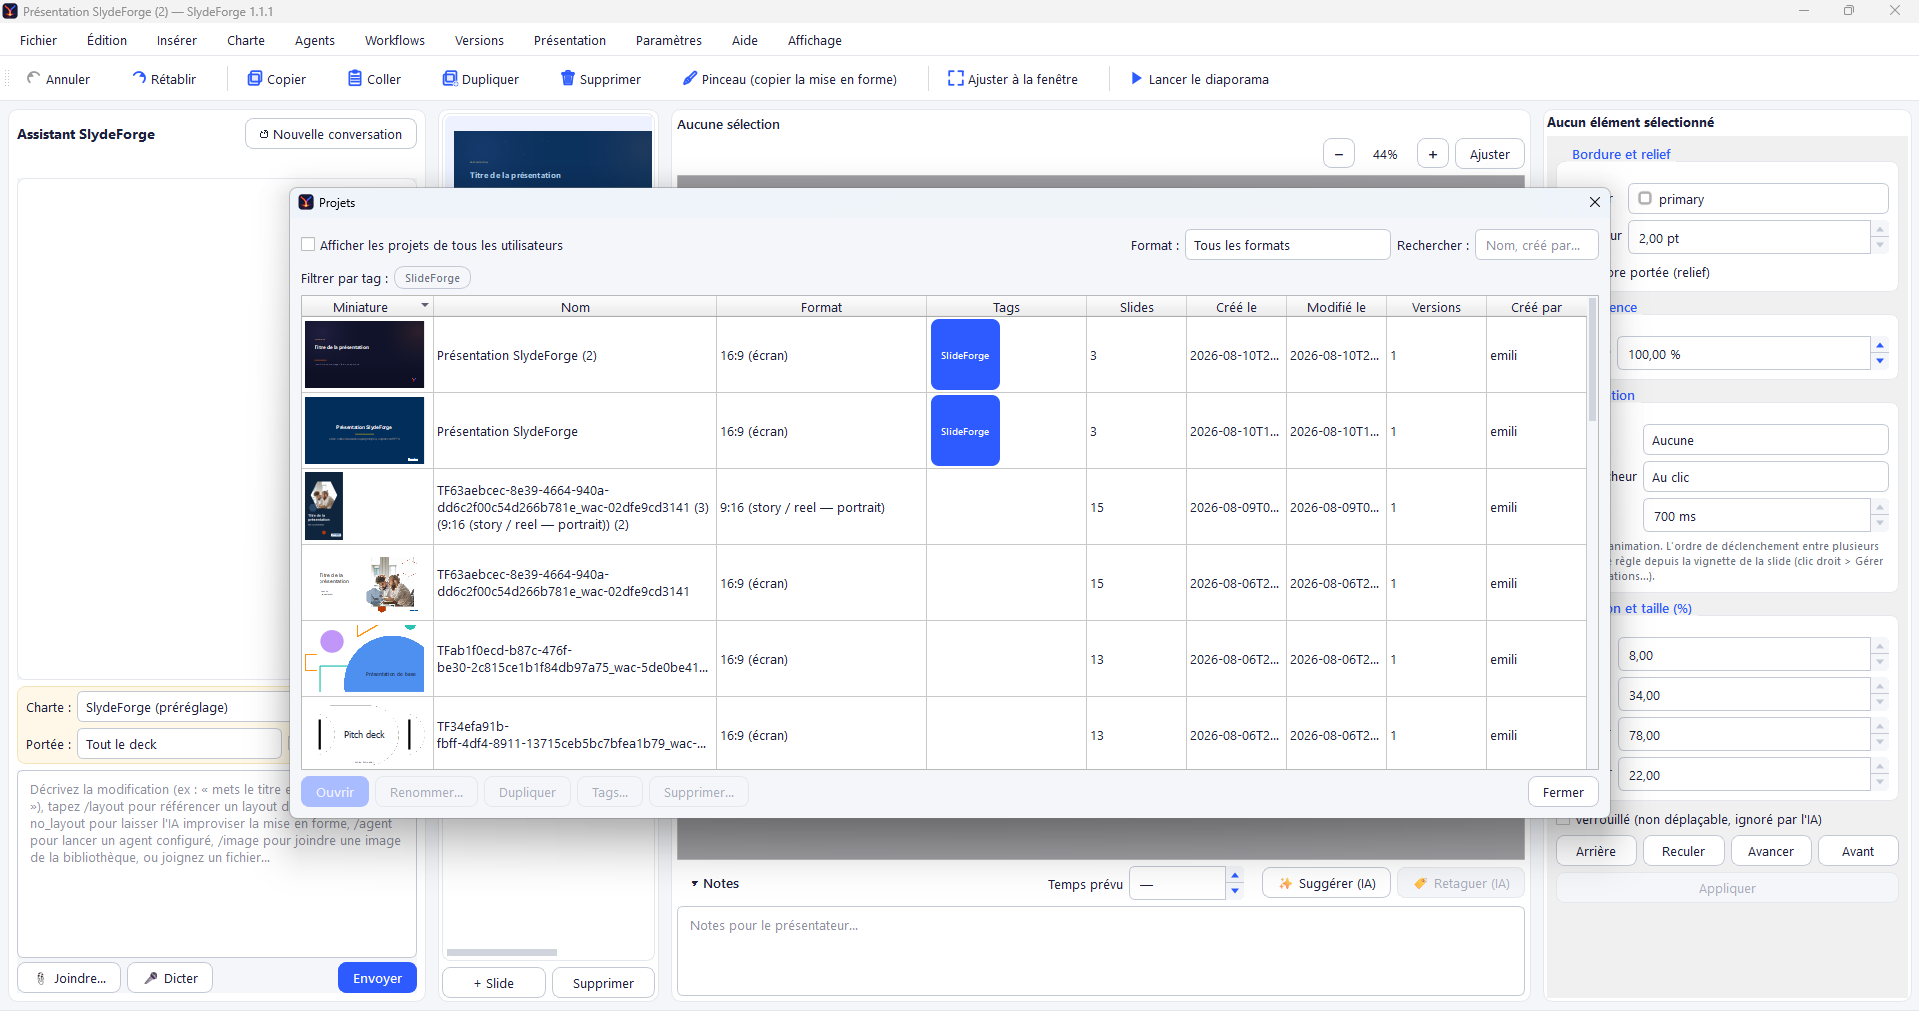
Click a column header to sort (by name, number of slides, date…), or use the Search field (by name or by creator) to filter the list. Renaming and deletion are available from this same window. On an installation shared between several users, only your own projects are shown by default (checkbox to also see other users' projects).
15. Settings
The Settings menu groups six entries:
Local model (Ollama, LM Studio…) through the OpenAI-compatible API: Test connection runs a plain-language model check — measured speed translated into the time to build a presentation, "thinking" mode (and whether it can be turned off), compliance with the expected response format and, for Ollama, vision, context length, share of the model loaded on the graphics card and models already installed. Each point comes with "What to do", simple criteria for choosing a model and a Copy a question to ask an AI button (measurements included) to get advice for your hardware. "Reasoning" models (gemma4, qwen3, deepseek-r1…) are automatically used without thinking, much faster for SlydeForge; the Allow thinking mode checkbox (unticked by default) keeps it. "New from a brief" and workflows use SlydeForge's generation engine: the AI writes the content and SlydeForge computes the layout from your brand kit (fast, token-efficient, no overflowing text, reusing your brand kit's slide types). At the end of a generation, the assistant thread flags any figures that are not in your brief or files, for you to check.
- AI… — a 3-tab dialog, personal settings stored locally per user (never shared on a shared installation): AI (backend in use, with a built-in check that verifies the configuration is correct — either a personal API with your own key: GitHub Copilot Enterprise, GitHub Models, or an OpenAI-compatible API, no limit imposed by SlydeForge, billed by your provider at its own rates, free with Ollama locally; or the SlydeForge API, hosted and metered in tokens included with certain subscription tiers, nothing to enter, with a usage gauge that warns before the limit is reached and offers to move to a higher tier or switch to your own key), Images (reorganized into Search — API keys for royalty-free photo search, Unsplash and/or Pexels, each with a direct key-creation button, an All/Unsplash/Pexels selector appearing once 2 providers are configured, see section 6 — and Generation, API key/URL for AI image generation) and Dictation (voice dictation of the prompt, with microphone selection). At the bottom of the dialog, three buttons give access to the SlydeForge subscription when offered: Subscribe ↗, Manage my subscription ↗, and Restore purchases… (recovers a subscription or a marketplace component purchased from the website, even before installing the application, from the email used at purchase).
- Language… — choice of interface language (French/English, with a flag) in a dedicated popup; a restart is offered immediately to apply the change.
- Voice… — configures the text-to-speech engine used for automatic voice reading of notes in presentation mode and for video export — see section 21 for the full detail on engines, voices, and settings.
- Update from a .zip file… — applies an application update from a provided release .zip file (e.g. from the author), after confirmation and reading the detail of all changes since the installed version. Never touches your projects or preferences (a completely separate folder).
- Check for marketplace updates… — forces an immediate check of all 4 marketplaces (brand kits, workflows, workflow components, interactive components) at once, instead of waiting for the automatic check at startup.
- Privacy… — enables or disables the sharing of entirely anonymous usage statistics (installed version, interface language, operating system, a random identifier — never your name, email, or the content of your presentations), used solely to guide the application's future development.
The Subscription menu, kept separate from Settings to avoid mixing everything together, only appears if a SlydeForge subscription is offered. Without an active subscription, it offers Subscribe… and I already have a subscription (different email)…; once subscribed, it shows the current AI usage and Manage my subscription… (cancellation, tier change, invoices).
16. Help and user feedback
The Help menu groups:
- User guide… (shortcut F1) — opens this guide directly from the application.
- Initial AI configuration… — reopens the first-time setup wizard, useful for reconfiguring the AI backend from scratch.
- User feedback & areas for improvement… — a log of your feedback, with a dedicated tab for the history of AI syntheses that group it into concrete areas for improvement. Every 👍/👎 sent from the chat (see section 3) triggers a confirmation before being shared with the author; the first submission asks for an email address verified via a link (anti-spam protection, never visible before confirmation). A dedicated checkbox lets you never be asked again for this sharing, reversible at any time — you can always send feedback manually from this window.
- About — installed version and contact links.
17. The workflow editor (advanced feature)
A workflow automates a repetitive processing chain (e.g. "always turn this KPI Excel file into a dated presentation") without going through a manual prompt in the chat every time. This is an advanced, optional feature, best explored once you're comfortable with the basics of SlydeForge.
A workflow is a graph of blocks connected to one another (data source, transformation, AI, connector, export…), which you build visually — never any code to write.
Creating, running, and managing a workflow
The Workflows menu lists your saved workflows (clicking one runs it directly) and offers Manage workflows…, which opens a window for New…, Duplicate, Delete, Export… (a self-contained .json file, easy to share), and Import… a workflow. A workflow can also be run directly from the chat by typing /workflow followed by its name.
The same menu also offers two distinct marketplaces: Component marketplace… (new executable blocks to install into the palette) and Workflow marketplace… (complete ready-made graphs, installable in one click). As with the brand-kit marketplace, an available update for an already-installed item is flagged, but never applied on its own. Some components can be paid (a price badge is shown as soon as it's selected, with a Stripe/PayPal purchase or subscription offered before installation); a component you already installed stays usable even if it later becomes paid — only a new install or update can then require it. A missing dependency (e.g. a Python package) is automatically offered for installation, with no technical steps on your part.
SlydeForge ships with a single sample workflow, ready to use right after installation: "Sample: summary to PPTX". It ingests a sample Excel file (fictional KPIs across several tabs), generates a complete presentation from that data (planning, then slide-by-slide generation, with a rich brand kit applied automatically), then exports it to .pptx under a dated filename — a concrete demonstration of the date-handling blocks ("Today's date" → "Set a variable" → … → filename).
The visual editor
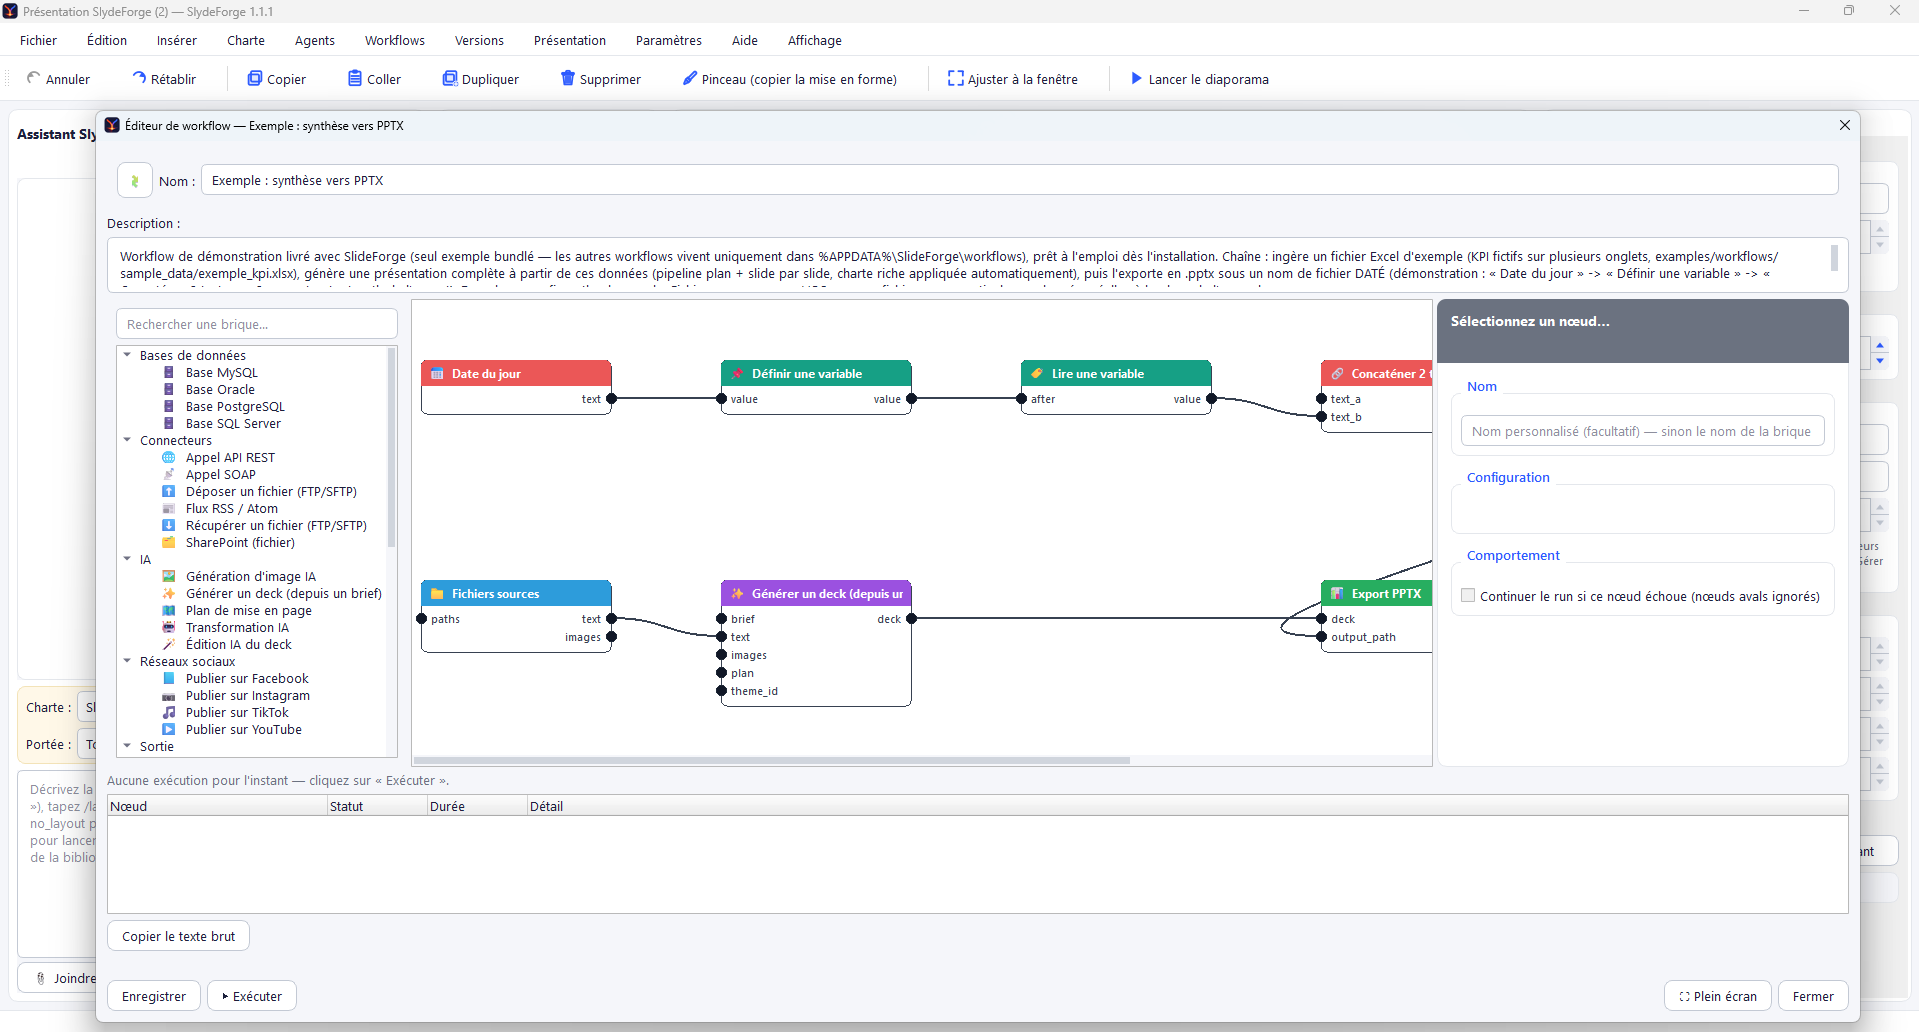
- Block palette (on the left) — organized by category (Sources, Transformation, AI, Connectors, Databases, Social networks, Variables, Output) with a search field; drag and drop a block onto the canvas to add it.
- Canvas (in the center) — the workflow's nodes, connected by dragging a link from an output point to an input point. Right-clicking a node offers to duplicate or delete it.
- Configuration panel (on the right) — appears for the selected node: an optional custom name, the settings specific to that block, and the behavior on failure (the "Continue the run if this node fails" checkbox, so a non-blocking secondary node doesn't interrupt the entire workflow).
The Save and Run buttons are at the bottom of the window; Run launches the workflow directly from the editor and feeds the debug trace just below it (one line per node: status, duration, detail), with a Copy Raw Text button handy for sharing the details of an error. The ⛶ Full screen button (or double-clicking the header, or the F11 key) toggles the editor to full screen for working on a larger graph.
18. Agents (reusable prompts)
An agent is a saved, reusable prompt for a recurring request (e.g. "Training follow-up": a ready-made prompt to chase the team about overdue training), so you don't have to retype it every time.
Agents > Manage agents… opens the list of configured agents: create, edit, or delete an agent. Each agent has a name, an optional description (to help pick the right one from the list), and a prompt (to complete if needed before sending).
Once configured, an agent appears directly in the Agents menu: clicking it inserts its prompt into the chat's input box. The same mechanism is available by typing /agent in the chat.
19. Interactive presentation components
An interactive component turns a slide into a live surface during the slideshow — a real-time poll, a shared whiteboard, a wall of sticky notes — driven from the room without ever leaving presentation mode. The audience responds from their phone (no app to install, a simple QR code opens a web page), and the result appears live on the projected screen.
Adding a component
The Insert > Interactive menu lists the available components:
- Whiteboard (Drawing) — included by default, nothing to install.
- Other components are offered via Interactive component marketplace…, at the bottom of the same menu — see below: Poll/Rating, Sticky notes/Zones, and External application (embeds a website, a file, or an .exe application directly in the slide — for example showing a web page or driving an Excel workbook live during the presentation, with no need to open it yourself beforehand).
Clicking a component adds it to the currently displayed slide. Some (like Poll) first open a preparation dialog — for example the question to ask and the choices offered, as well as the position/size of the display zone (drag-and-drop on a slide preview) and its colors (brand-kit role or custom color, for the background and text).
Viewing, configuring, or removing a component
As soon as a slide carries at least one interactive component, a small bar appears just above the canvas, with one chip per component:
- ⚙ Configure… — reopens the preparation dialog, pre-filled with the current settings (only available for components that have one, e.g. Poll — the Whiteboard has nothing to prepare in advance); some components (e.g. Poll) also offer a button there to reset already-collected results without removing the component.
- 👁 / 🚫 — enables or disables the component without deleting it (a disabled component doesn't appear during the presentation, but stays configured).
- ✕ — permanently removes the component from the slide.
All three actions can be undone (Ctrl+Z), like the rest of the editing.
During the presentation
In presentation mode, the component automatically appears over the slide as soon as it carries one that's enabled — never a permanent toolbar: what's shown depends only on the components present on the slide currently displayed.
For the Whiteboard: a small floating palette (pen, highlighter, shapes, text, 5 colors) appears at the top of the slide; Ctrl+Z/Ctrl+Y undo/redo a stroke (a stack scoped to the presentation session, independent from the document's edit history); the Reset button clears everything.
For a networked component like Poll: a QR code appears on screen, the audience scans it, responds from their phone (no account needed), and answers arrive live on your projected screen.
Marketplace of interactive components
Insert > Interactive > Interactive component marketplace… opens a catalog of components published online, installable in one click (search, categories, updates, removal). Each entry clearly states the component's network usage before you even install it — for example "1 request every 1-2 seconds during an active presentation" for a component like Poll (which relays the audience's votes via a QR code), or "none" for a fully local component like Sticky notes. As with the workflow component marketplace, some components can be paid (price badge, Stripe/PayPal purchase or subscription offered before installation) without ever affecting a copy you already installed.
Custom Python component — a .py file obtained elsewhere (e.g. downloaded manually from the site) installs by dropping it into SlydeForge's slide_component_addons/ folder: it registers automatically at the next startup, using the same mechanism as the built-in Whiteboard.
Navigating during a presentation
Two small ‹ and › buttons appear discreetly on the left/right edges of the screen in presentation mode — see section 10.
20. Transitions, animations, and advanced AI assistance on slides
Right-clicking a slide in the strip (see section 2) offers, beyond Rename/Duplicate/Insert/Hide, several advanced tools — some mechanical, others AI-assisted.
Manual settings (mechanical, no AI)
- Slide transition… — chooses the transition shown when arriving on this slide, from a catalog of about twenty effects (fade, push, zoom...). Visible in the SlydeForge slideshow and in the PPTX export.
- Manage animations… — lists every animation on the slide's elements, with their order (each animated element gets a numbered badge on the canvas to help you tell them apart); lets you reorder, edit, or delete them all at once.
- Object animation… (right-click on a canvas element) — configures the animation of a single element, with the same settings as the properties panel.
AI assistance, slide by slide
These actions are also one click away through the Formatting, Challenge, Photo, AI image and Animation buttons above the canvas. Like generation, they let the AI work on the content while SlydeForge recomputes the layout in your brand kit: the result stays clean (no overflowing text, readable contrast), and the slide keeps its notes, planned time and transition.
- Suggest layouts… (Formatting button) — a 2-step wizard in a window that stays open (an indicator shows work in progress), with real previews in your brand kit: 1. Structure — the AI proposes other ways to present the same content (cards, steps, key figures, comparison, one of your brand kit's templates…), the current version last for comparison; 2. Art direction — an AI art director imagines complete and genuinely different creative choices: value-based color coding (green / orange / red for scores, rates or statuses), a title banner in the brand color, an immersive slide in the strong color, editorial typography, a highlighted element… Its ★ recommendation is preselected and explained; hover a thumbnail to read the idea. SlydeForge composes each direction in your brand kit and discards (or tones down) any proposal that would overflow or hurt readability. Not quite it? The ✨ Refine bar below the gallery takes a free-form request ("keep the color coding but with the banner"); select two proposals (Ctrl+click) to combine them — the direct combination comes first, followed by variants built from your selection. Directions can also use relief (drop shadows), value color coding as tinted backgrounds (your brand kit's tints) and status icon badges ✓ / ⚠ / ✗ from your brand kit; if part of your request can't be done with the chosen structure, the AI says so below the recommendation and suggests what would. Ask for a photo in this bar (“add a royalty-free image”): each direction gets a real photo from your image banks, with its credit. 🔍 Enlarge (or Space) shows the selected proposal in large size next to the current version, with mouse-wheel zoom — also in the Photo window. The Create a new slide checkbox adds the layout right after the original slide, which stays untouched (handy to reuse elements). The token cost is shown live in the window. ◀ Previous step undoes the last refinement, then goes back to the structures; nothing changes until Apply, and a single Ctrl+Z undoes it all.
- Slide review (AI)… (Challenge button) — a window first shows the substance diagnosis (does the title state the message? is the content clear and not too dense? is there a better representation?) then asks up to 3 targeted questions — message to remember, element to bring out, level of ambition (light touch-ups or bold redesign)… — with one-click answers, a free answer and an "Anything else to specify?" field. The improved version follows your answers (a redesign boldly changes title, representation and hierarchy) and appears in the usual before/after preview. Visual requests ("more colors, icons, relief") are followed: if the slide uses one of your brand kit's templates, whose look is fixed, the AI can switch to an equivalent layout that allows them (keeping a header banner consistent with the deck), and the assistant says what couldn't be done. A Your remarks or comments field, always visible, lets you add what you expect from the slide. Answering is optional: Propose without answering goes straight to the rewrite (your remarks are still taken into account). Your answers and the token cost are recorded in the assistant; if figures or dates disappeared or appeared in the new version, the assistant flags them before the preview.
- Royalty-free photo (Photo button, or the
/suggest_imagecommand in the assistant, optionally followed by a description:/suggest_image a construction site at sunrise) — requires a configured image bank (Settings > Images, Pexels or Unsplash key; otherwise the assistant tells you, at no cost). From the slide's message and the presentation's theme, the AI derives several concrete searches, then the window shows up to 6 photos already built into your slide — if its layout cannot host a photo (brand-kit template, cards…), it is transposed while keeping all its texts, icons and color coding, and the photo sits beside it (landscape) or as a band (portrait, square). The photographer credit is set in white on a dark scrim, readable on any photo. Not the right picture? Describe the one you want in the ✨ Refine bar (“brighter”, “people at work”) to search again. Create a new slide keeps the original; the current version is offered last for comparison. The token cost (≈ 2,000 per search) is shown in the window and in the assistant. - AI-generated image (AI image button, or the
/generate_imagecommand, optionally followed by a description:/generate_image watercolor style) — only shown when an image generation service is configured (Settings > AI). A warning first reminds you that it is slower than a royalty-free photo (often 20 to 60 s) and that each image is billed by your service; there you choose how many images to compare (2 by default, up to 4 — remembered, with a "Don't show this warning again" box). The AI imagines clearly different image ideas for the slide, SlydeForge checks the layout before starting the generation, then the images appear already built into your slide, in the same window as Photo (✨ Refine for a new generation — billed again —, 🔍 Enlarge, Create a new slide). - Animate slide (AI)… (Animation button) — on a slide produced by SlydeForge, the sequence is computed instantly with no AI call (one click per card, key figure, step or milestone; the title stays put); on an imported or hand-made slide, the AI analyzes it as an image. Suggestions are presented in a checklist before being applied.
AI assistance, on a selection or the whole deck
- Suggest transitions (AI)… / Suggest notes (AI)… — available from the right-click menu (on the displayed slide, or on a multi-selection of thumbnails) and from the Slideshow menu to target the entire deck in one click; if notes already exist on a slide, they're compared against the proposal before validation. Transitions follow a computed pacing (short fade between content slides, more pronounced for the cover, push for a new section), with no AI call. Notes (like ✨ Suggest notes above the Notes field) are written from the slides' text and animations: animation tags are placed where the speaker addresses each element, in the exact number; 🏷️ Re-tag notes repositions those tags without ever changing your text.
- Review animation tags… (Slideshow menu) — reviews the animation tags present in the notes of every slide, with assistance to correct or complete them manually according to the intended animation sequence.
21. Text-to-speech voices (narration and video export)
SlydeForge can read the presenter's notes aloud during the slideshow, and bake that voice into a video export. Voice reading is optional: SlydeForge works normally with no voice engine installed at all.
Choosing a voice engine
SlydeForge supports three engines. The choice is made in Settings > Voice.
| Engine | Quality | Offline | Cost | Installation |
|---|---|---|---|---|
| Edge Neural | Very high | no | Free, no key | pip install edge-tts |
| Piper | High | yes | Free | pip install piper-tts + a model |
| ElevenLabs | Very high | no | Paid (API key) | pip install requests |
Privacy — The Edge Neural and ElevenLabs engines work online: the text of your notes is sent to a remote service to be converted into speech. If your notes contain confidential information, use Piper, which runs entirely on your machine — no data ever leaves it. SlydeForge shows a warning before the first use of an online engine.
Quick install (recommended)
From within SlydeForge, in Settings > Voice…, choose Edge Neural or Piper — an Install… button appears automatically if the engine isn't yet present on the machine. It asks for confirmation, then opens a window showing live installation progress: no command to type. The instructions below remain useful for a manual or offline install.
Edge Neural — the best free quality:
pip install edge-ttsNo key, no account, no model to download. Included voices:
| Identifier | Language | Character |
|---|---|---|
fr-FR-DeniseNeural | French | Female, calm and neutral (FR default) |
fr-FR-HenriNeural | French | Male, warm |
fr-FR-EloiseNeural | French | Female, younger |
en-US-AriaNeural | US English | Female, professional (EN default) |
en-US-GuyNeural | US English | Male, confident |
en-GB-SoniaNeural | UK English | Female, British |
To list every available voice: edge-tts --list-voices
Piper — the best offline quality:
pip install piper-ttsPiper needs a voice model (an .onnx file with its matching .onnx.json) — see the next section.
Adding voices
Drop the models into SlydeForge's voices folder: <SlydeForge data folder>/voices/. Each voice = two files sharing the same name:
voices/
  fr_FR-siwis-medium.onnx
  fr_FR-siwis-medium.onnx.json
The filename (without .onnx) is the identifier to select in Settings > Voice.
Where to find free, open voices:
| Source | Content | License |
|---|---|---|
| Piper voice library (huggingface.co/rhasspy/piper-voices) | Neural voices for ~50 languages, including several FR and EN voices | Open (MIT / CC) |
| Piper samples (rhasspy.github.io/piper-samples) | Side-by-side listening before downloading | — |
| Common Voice (Mozilla) | Voice corpora for training your own voices | CC0 |
| Coqui TTS | Alternative engine, trainable models | MPL 2.0 |
Recommended French Piper voices: fr_FR-siwis-medium (clear female voice), fr_FR-upmc-medium (articulate male voice), fr_FR-tom-medium (deeper male voice).
Recommended English voices: en_US-lessac-medium (very natural female voice), en_US-ryan-high (male, higher quality, heavier file).
ElevenLabs and compatible APIs — enter your API key in Settings > Voice. The voice identifier is the name (or ID) as shown in your ElevenLabs library. This connector uses the standard text-to-speech REST API: any service exposing the same interface can be used by changing the base URL.
Playback settings
| Setting | Range | Effect |
|---|---|---|
| Speed | 0.5× to 2.0× | 1.0× = the model's natural pace |
| Volume | 0 to 100% | Applied at generation time |
| Language | FR / EN | Determines the default voice |
Pronunciation and intonation
Speech engines systematically mangle certain acronyms and loanwords. SlydeForge fixes this before sending the text to the engine, via a built-in lexicon:
| Written | Pronounced |
|---|---|
KPI | K.P.I. |
ROI | R.O.I. |
API | A.P.I. |
AI | A.I. |
SaaS | Sass |
UX | U.X. |
PPTX | P.P.T.X. |
The replacement respects word boundaries and case: "ROI" (the metric) is corrected, while a lowercase word that happens to match is not. Notes written as bullet points are converted into punctuated sentences: each line becomes a complete sentence, forcing the engine to mark a pause instead of running everything together in a flat tone.
Tips for a natural result: write notes the way you'd say them, not like a written summary; prefer short sentences — long sentences produce a flat, monotone delivery; spell out numbers in words when pronunciation matters ("twenty twenty-six" rather than "2026"); for a word that's consistently mispronounced, write it phonetically directly in the notes.
Video export
Video export assembles the slides (with their animation steps) and the voice generated from the notes. It requires ffmpeg, a free external tool that cannot be installed from within SlydeForge:
winget install ffmpegbrew install ffmpegsudo apt install ffmpegSlydeForge automatically detects ffmpeg once installed. If it's missing, the export screen shows how to get it — nothing is ever downloaded automatically.
For each slide, the duration used in the video is whichever is longer: the duration of the audio generated from its notes, or the planned time set on the slide — so a sentence is never cut off midway. Hidden slides are excluded from the video.
↑ Back to top